Using the XoT-Desktop Client
Related Articles and Resources
This guide assumes you have the XoT-Desktop software installed and configured.
- If you don't have the XoT-Desktop application on your device, please contact your IT department or party responsible for supplying software to your device.
- If your organization does not have the XoT-Desktop software contact your Xertified representative or create a ticket here.
- If you have the XoT-Desktop software available and are an administrator on your device, you may consult the installation guide.
- If you have the XoT-Desktop app installed but it is not configured for any user, see the configuration guide.
What is XoT-Desktop Client?
XoT-Desktop is a desktop application that allows you to safely connect to remote services and devices. Think of it as a secure gateway that lets you access company resources, remote computers, or web services while maintaining strict security controls.
Most importantly, XoT-Desktop is designed to work automatically in the background. Once configured, it provides seamless access to protected networks and devices without requiring constant user interaction.
Getting Started
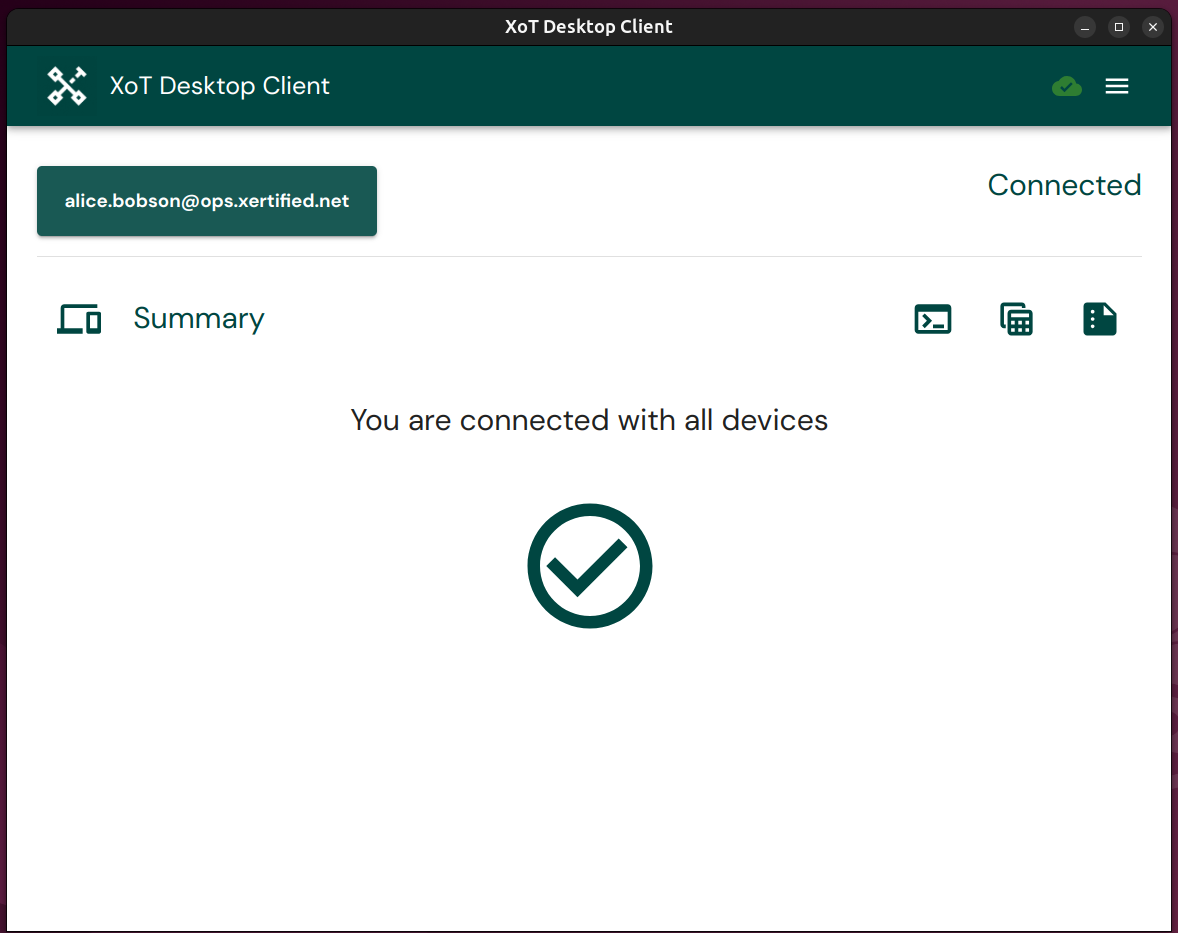
When you first open XoT-Desktop, you'll be presented with a summary of your connection status.
Selecting Your Security Token
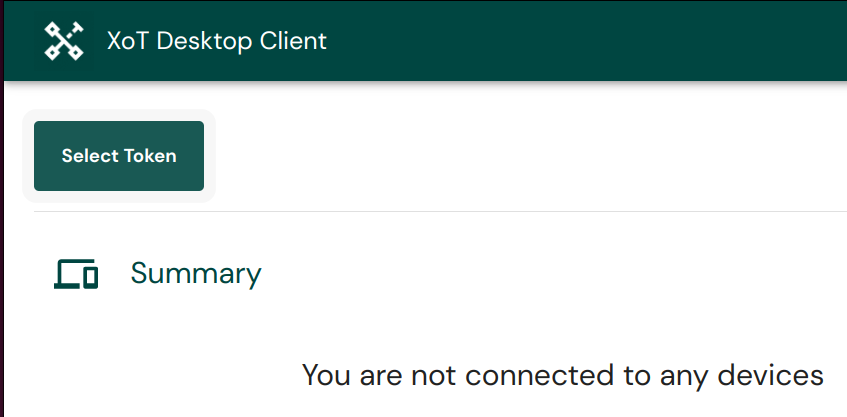
If the green button in the top left does not specify your username but instead says Select Token, then you must first select your security token before you can connect to any services:
-
If you have a YubiKey or similar device, insert it into your computer
-
Look for the "Select Token" button in the interface
-
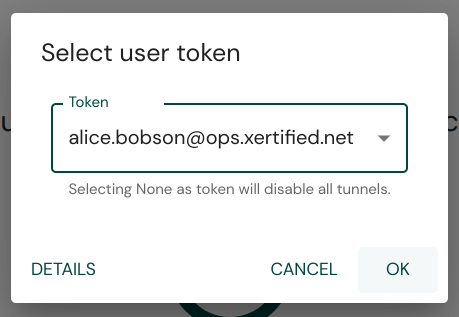
Click it to open the token selection dialog
-
Choose your security token from the dropdown list
-
Click OK to confirm your selection
Your security token is always required for the application to be able to establish connections to protected networks and devices. The token may be a software or hardware token depending on how your organization has set things up.
First-Time Setup with Onboarding Wizard
If the XoT-Desktop Client has not been configured, it will present an onboarding wizard that guides you through the setup process:
- Authentication — The wizard opens your web browser to your organization's identity provider. Log in with your credentials.
- Token selection — Choose the type of security token to use (software certificate, YubiKey, smart card, etc.).
- Configuration download — The wizard downloads and imports your configuration package automatically.
- Completion — Once the setup finishes, the client is ready to use.
If the onboarding wizard does not appear, or if your administrator has provided you with a .zip configuration package, see the configuration guide for manual setup.
Service Access
The Service Access view provides a way of quickly accessing the commonly used services that are available on connected networks or devices. This works by providing clickable links that your operating system can automatically open with a suitable application. They can be things like websites, remote desktops, SSH or whatever your system administrator has made available.
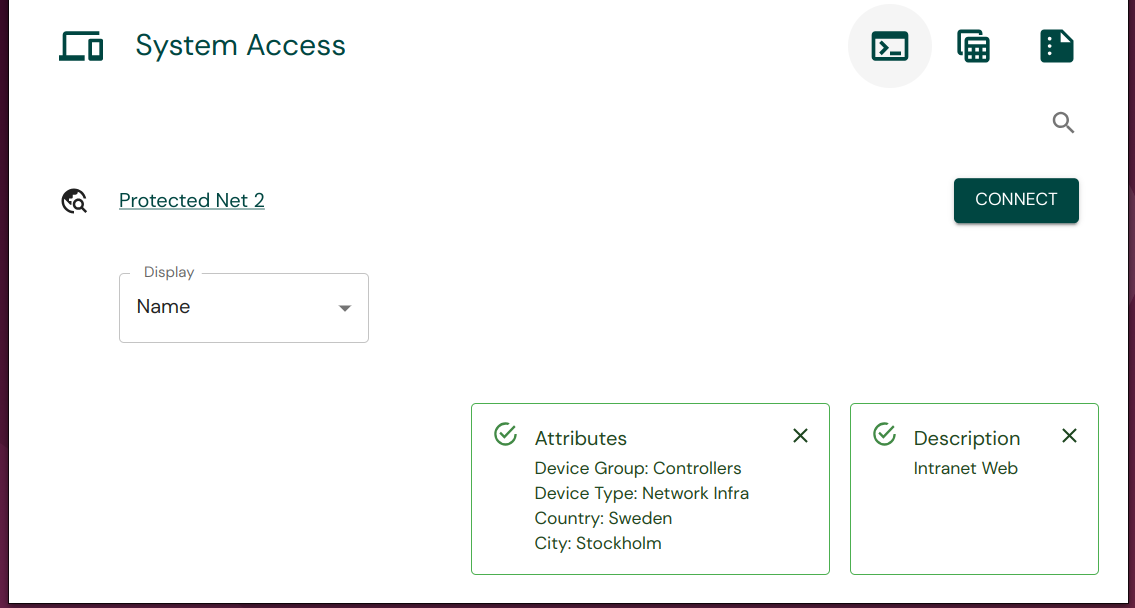
Clicking a service link will launch the appropriate application for that protocol:
- HTTP/HTTPS links open in your default web browser
- RDP links launch a Remote Desktop session to the target machine
- SSH links open a terminal with an SSH connection to the target
- SFTP links open a secure file transfer session
- Telnet links open a terminal session for legacy systems
Once you are logged in, XoT-Desktop will establish connections to all the protected devices and networks that your user has been given access to. You can now access them using whatever applications you normally would.
If you would like to know more about the state of your current connections or how to debug failing connections, then you can continue with the more in depth sections below. For most users this is not necessary however and the XoT-Desktop client is happy to make everything available in the background without any user action.
The XoT-Desktop Interface
Device Connections
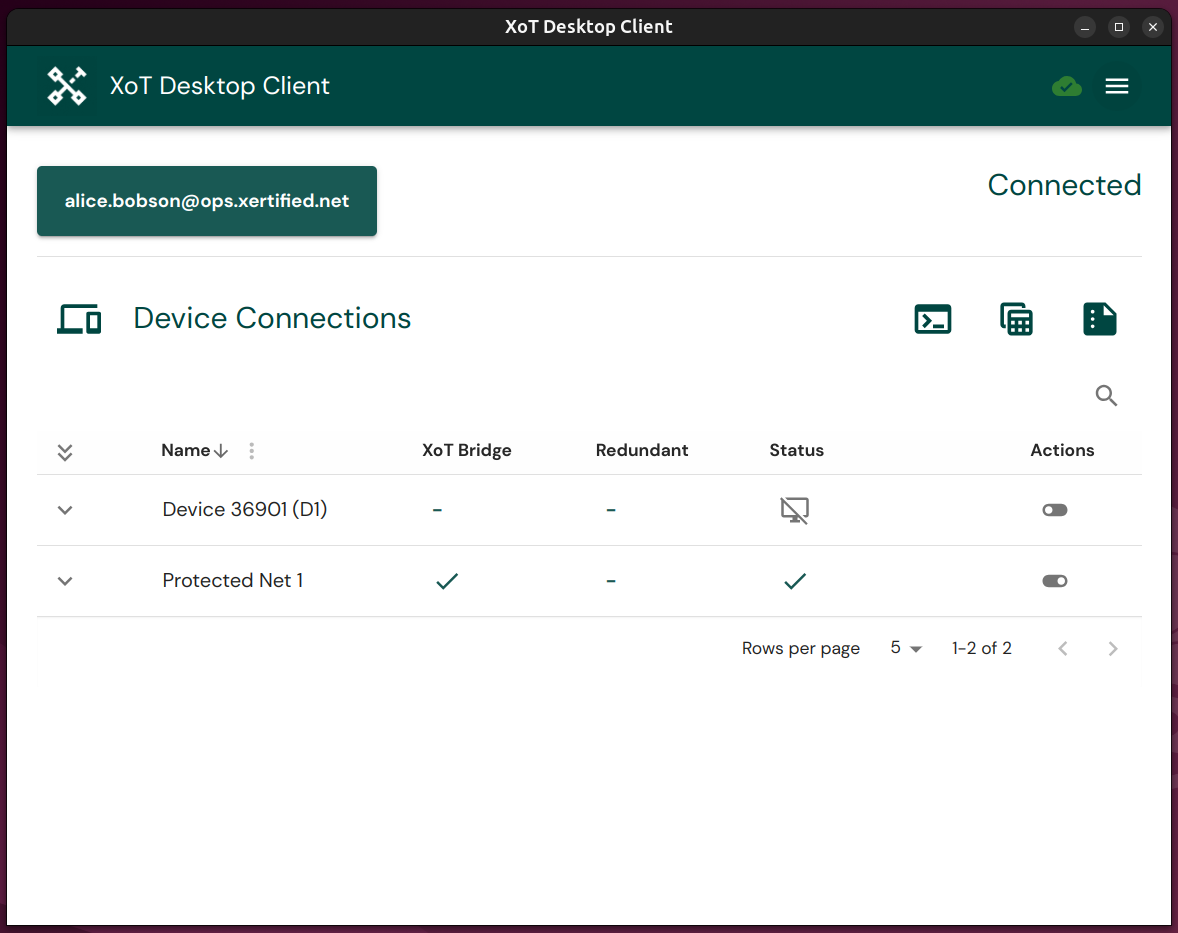
In the Device Connections page you will see a listing of connections your client has access to via your user token.
From here you can see the current connection status, whether the connection uses an XoT-Bridge, has redundancy and a manual toggle to manually enable or disable individual connections.
Connection Status
Each connection displays a status indicator:
- Online — Tunnel is active and the protected device is reachable. This is the best state.
- Connected — WireGuard tunnel is established but the device has not yet responded to connectivity checks.
- Init — The connection is being initialized. If it stays in this state, check the Connectivity details.
- Invalid — The connection has a recoverable issue (e.g., ticket expired). The client will attempt to resolve this automatically.
- Error — The connection has a problem that requires attention. Check the connection details for more information.
Connection Details
On the left side of every device connection you can also see an arrow that can expand the connection to provide more information about it:
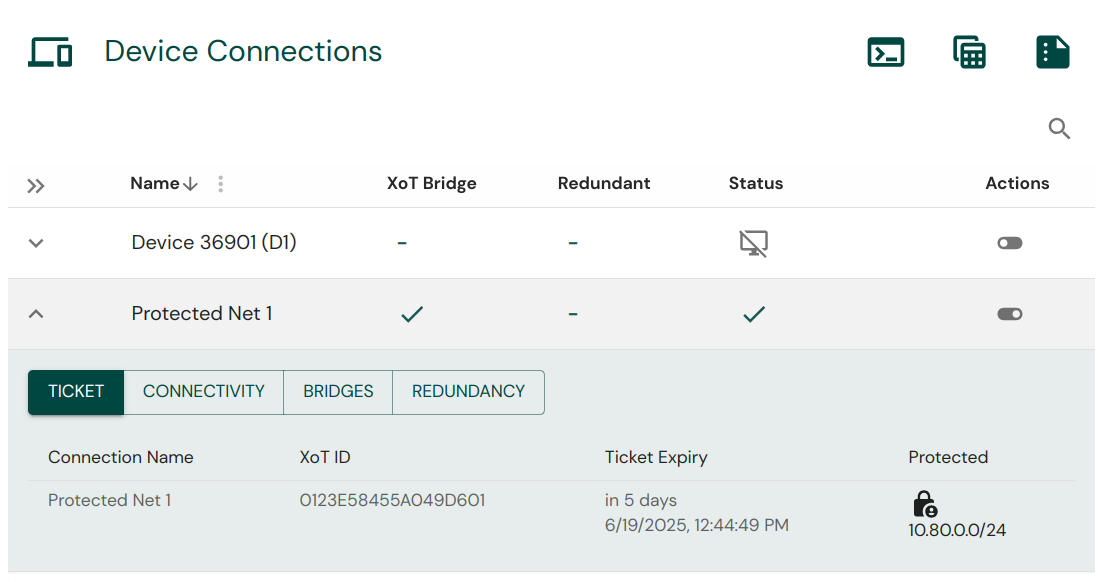
- Ticket: Shows more information about what your client has been given access to, how long the current ticket lasts, and what is the IP of the protected device or subnet.
- Connectivity: Shows connection related information useful for validating or debugging connections, including the result of challenge-response checks and the network endpoint (IP:port) being used.
- Bridge: If the connection to the protected device or network is going through an XoT-Bridge, you can see which bridge is being used here.
- Redundancy: Shows the level of redundancy for the connection, including whether backup bridges are available.
Enabling and Disabling Connections
Each device connection has a toggle that allows you to manually enable or disable it. This can be useful when:
- You only need access to specific devices and want to reduce active connections
- You are troubleshooting a specific connection in isolation
- Your administrator has asked you to temporarily disable a connection
Disabled connections will not establish tunnels until re-enabled.
The Status Sidebar
The XoT-Desktop client also provides a detailed status sidebar that shows you the current status of your client.
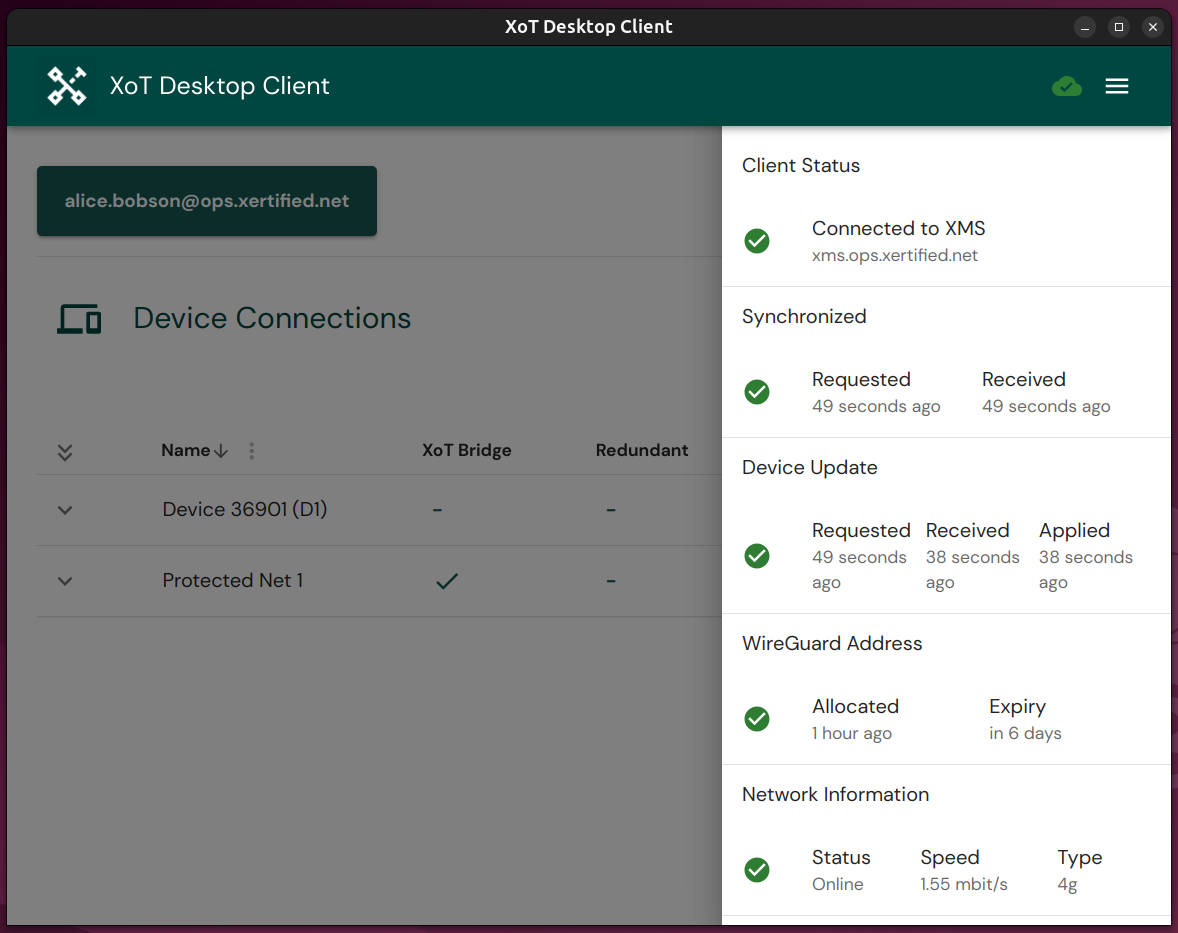
If something is not working this view can be useful to see exactly what is going wrong with your connections.
System Tray
The XoT-Desktop Client runs in the system tray (notification area) on all platforms. The tray icon provides:
- A quick visual indicator of your connection status
- A context menu to toggle the main window, view device status, collect support logs, manage preferences (autostart, notifications), or exit the application
Diagnostics and Support
Diagnostics
The XoT-Desktop Client includes a diagnostics view that shows real-time health information about each component:
- Engine — the connection management service
- Daemon — the networking service that configures WireGuard tunnels
- Proxy — the MQTT communication service
This view is useful for identifying which component is experiencing issues if connections are not working as expected. Open it from the system tray menu or by launching the client with --diagnostic.
Collecting Support Logs
If you experience issues and need to contact support, the XoT-Desktop Client includes a log collection tool:
- Open the support collection dialog from the system tray menu, or launch the client with
--support. - The tool bundles log files from all components (client, engine, daemon, proxy).
- Optionally enable verbose logging for more detailed diagnostics.
- The tool creates a password-protected ZIP archive containing the collected logs and system information.
- Share this file with your IT support or helpdesk through a secure channel.
Log File Locations
If you need to access log files manually:
- Windows:
C:\Users\<username>\AppData\Temp\Xertified\(user) andC:\Windows\Temp\Xertified\(system) - macOS:
~/.config/xertified/logs/(user) and/var/log/xertified/(system) - Linux:
~/.config/xertified/logs/(user) and/var/log/xertified/(system)
What to Check Before Contacting Support
Before reaching out to support, verify the following:
- Internet connectivity — can you browse the web normally?
- Token status — is your security token selected and recognized?
- Time synchronization — is your system clock accurate? XoT requires time sync for certificate validation.
- VPN conflicts — do you have another VPN or security software running that might interfere?
Troubleshooting
No Devices Appear After Login
- Verify that your security token is selected (check the button in the top left).
- Wait a moment for the client to connect to the XMS and receive your access tickets.
- Check the Status Sidebar for error messages or connection issues.
- Confirm with your administrator that your user account has active access policies.
Connection Stays in "Init" or "Invalid" State
- Init connections that do not progress to "Connected" within a couple of minutes may indicate a firewall blocking the XoT client's UDP traffic, or that the XoT-Lock (or bridge) is unreachable.
- Invalid connections typically mean the access ticket has expired or is not yet available. The client will attempt to renew the ticket automatically. If it persists, restart the client.
- Expand the connection details and check the Connectivity section for specific information.
Connection Shows "Error"
- Expand the connection details to see what caused the error.
- Verify that your internet connection is stable.
- If the connection uses a bridge, check the Bridge section to see if the bridge is reachable.
- Try disabling and re-enabling the connection using the toggle.
- If the error persists, restart the XoT Client.
"Select Token" Keeps Appearing
- Ensure your hardware token (YubiKey or smart card) is properly inserted.
- Try removing and reinserting the token.
- On Windows, check that the smart card service is running.
- If using a software token, verify that the configuration files are intact in your config directory.
Connections Work but Cannot Reach Services
- Verify that you are using the correct IP address or hostname for the service.
- Check that the access policy permits the specific protocol and port you are trying to use (e.g., SSH on port 22, HTTPS on port 443).
- Try pinging the device IP to confirm basic connectivity through the tunnel.
- Flush your DNS cache if connecting by hostname:
- Windows:
ipconfig /flushdns - macOS:
dscacheutil -flushcache - Linux:
resolvectl flush-caches - Check if there is a route conflict: if the protected device's IP address overlaps with your local network, the XoT client will display a notification about the overlap.
Client Will Not Start
- Verify that the XoT daemon service is running on your machine:
- Windows: Open Services and check for the
xot-daemonservice. - macOS:
sudo launchctl list | grep xertified - Linux:
sudo systemctl status xot-daemon - Try restarting the daemon service:
- Windows: Restart the
xot-daemonservice from the Services management console. - macOS:
sudo launchctl unload /Library/LaunchDaemons/com.xertified.xot-daemon.plist && sudo launchctl load /Library/LaunchDaemons/com.xertified.xot-daemon.plist - Linux:
sudo systemctl restart xot-daemon - If the problem persists, try reconfiguring the client using your
.zipconfiguration package.
For more troubleshooting scenarios, see the Troubleshooting guide.