XertifiedHide & Protect
Introduction
This document outlines common example designs illustrating how to use XertifiedHide & Protect. Choose a design that best fits your needs and proceed to the installation guides. For details about each component, please refer to their respective guides under "What is XoT Technology".
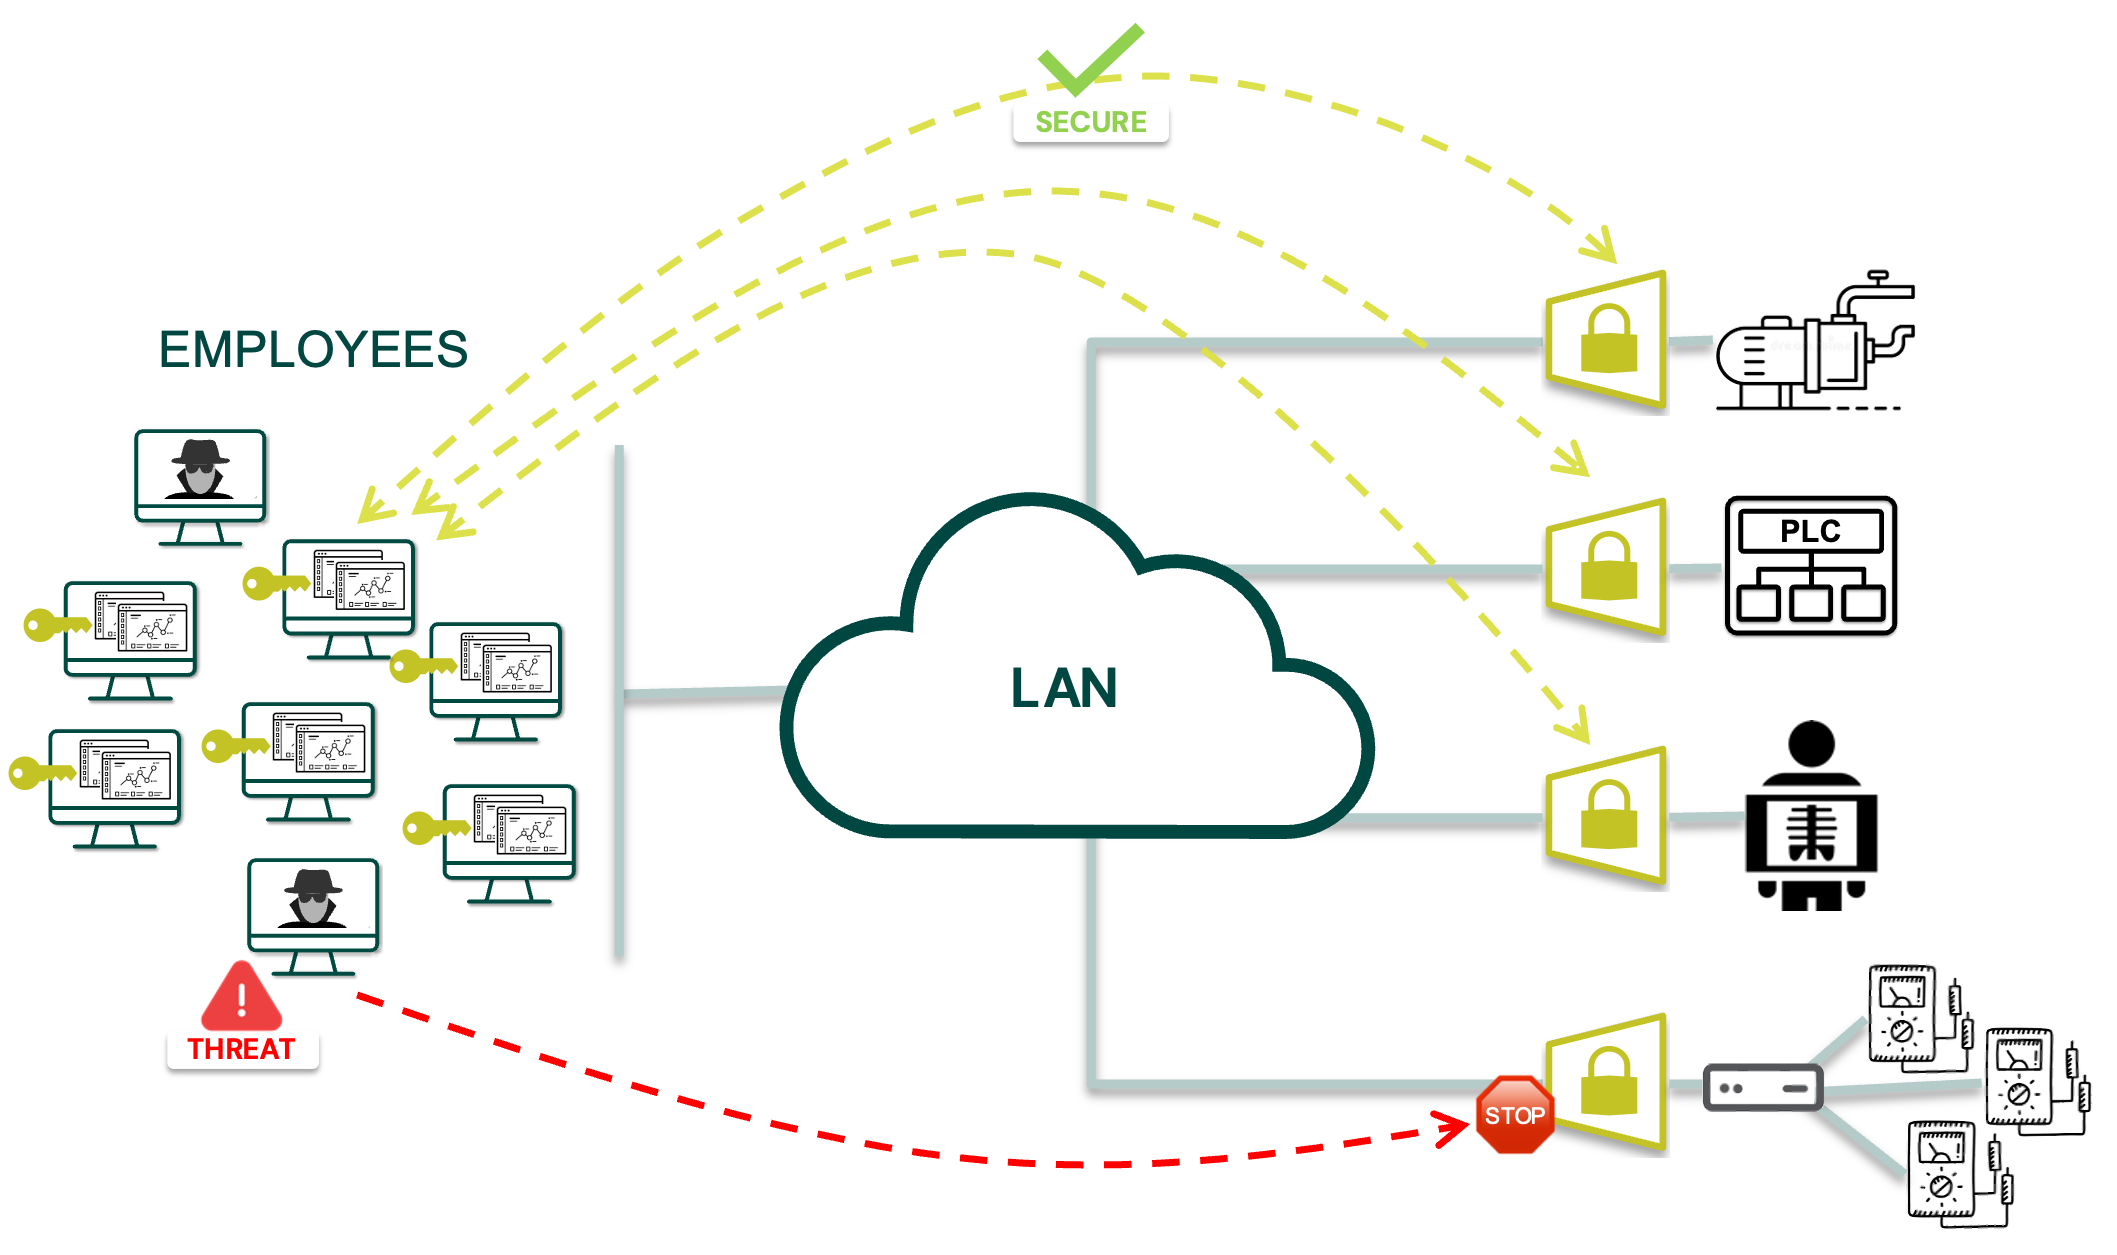
All setups using XoT technology require an XoT Management System (XMS). If you do not have an XMS installation, Xertified can provide one for you, or you can install one yourself using the XMS installation manual.
To configure your XoT you must have access to one or two XoT-Locks, depending on the setup. You can either use the Xertified S1 devices, or install an XoT on a x86 system of your choice.
Communication requirements
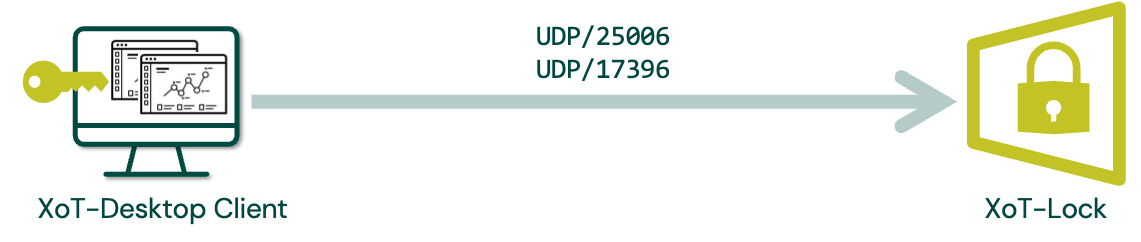
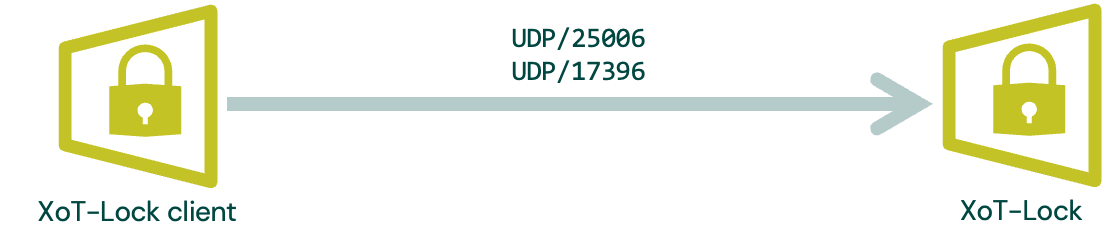
Here is a quick look at the TCP/IP and UDP/IP ports that are required for operation. The arrows depict IP traffic and the direction of session setup for any firewall configuration.
The client to XoT-Lock
These ports are default and can be altered in the XMS system under each XoT-Lock if required.
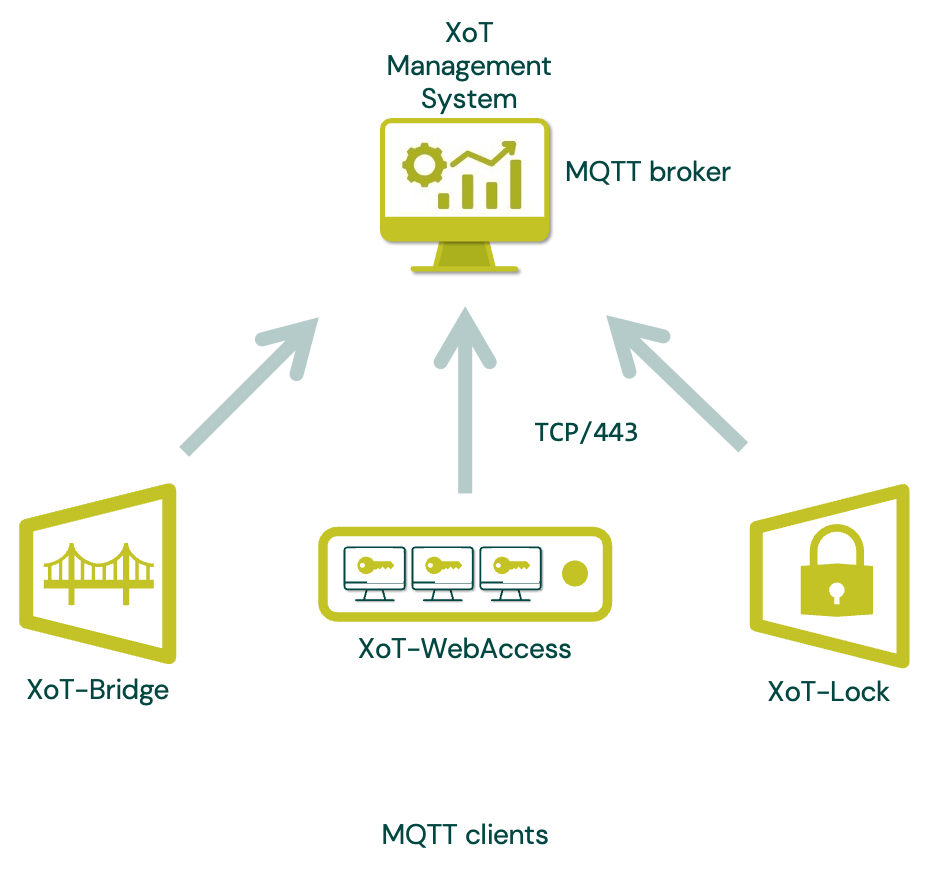
XoT components to XMS
The XMS require two IP addresses. One is used for HTTPS endpoints and one for MQTT, which is shown below.
Hide & Protect configuration examples
The deployment examples below assume that there is IP communication between the XoT clients and the XoT-Locks. The TCP and UDP port needed for this communication is shown in the diagram above.
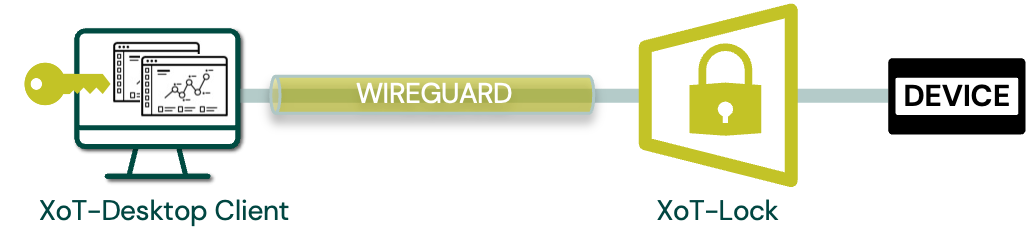
PC client communicates with a single device
The XoT-Desktop client is installed on a PC and connects to a device through a XoT-Lock in Single Device mode.
The device keeps the subnet membership in the mode of operation.
Prerequisites
- Admin access to an XMS installation
- Access to an XoT-Lock
- A client system with the XoT-Desktop client installed and configured with a user present in the XMS.
- A device that can be connected to the protected side of the XoT-Lock.
Setup guide
- Connect the external side of the XoT-Lock you want to use to a network that has access to the XMS.
- Enroll the XoT-Lock if it is not already enrolled in the XMS.
- Make sure the XoT-Lock has a reasonable classification: Device type, group, and location settings that can later be targeted by a policy. This can be edited by navigating to the XoT under devices and clicking on the Access control tab.
- Put a device of your choosing on the protected side of the XoT-Lock. Make sure this device exposes some sort of service that you can use to test access (e.g., HTTP/HTTPS/SSH/RDP).
- Configure the XoT-Lock in a single device configuration. Either leave it as DHCP or set the static IP that the protected device has.
- Create a policy which:
- Source: Type is set to a User Group which your client user belongs to.
- Destination: Device Type, Device Group and location settings match the classification of your XoT-Lock.
- How: The services you want to access are added to the Services list.
- Connect the client system to a network from which it can reach both the XMS and the external side of the XoT-Lock.
- Start the XoT-Desktop client and make sure that the user is selected in the top left dropdown.
- If everything has been set up correctly, the client will now get access to the device that is placed on the protected side of the XoT-Lock. You will see the status of this connection in the XoT-Desktop client.
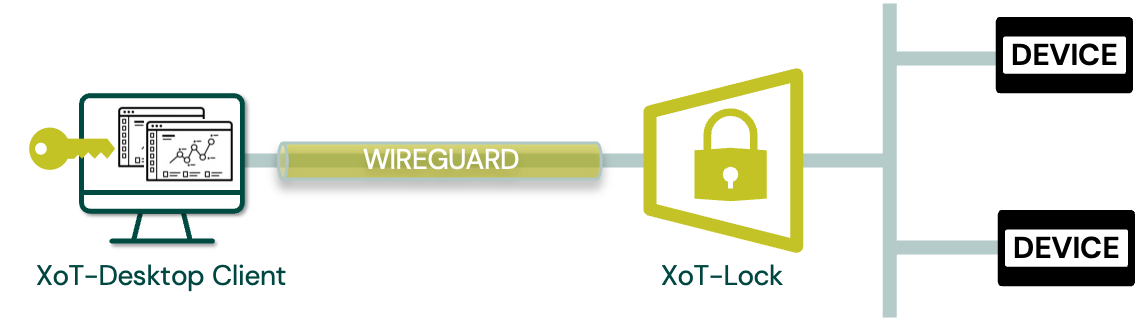
PC client communicates with multiple devices
The XoT-Desktop client is installed on a PC and connects to a device through an XoT-Lock in Multi Device mode.
The network(s) behind the XoT-Lock in Multi Device mode is a subnet that needs to be configured on the XoT-Lock. VLANs are supported with multiple subnets as required.
Prerequisites
- Admin access to an XMS installation
- Access to an XoT-Lock
- A client system with the XoT-Desktop client installed and configured with a user present in the XMS.
- At least two devices that can be connected on the protected side of the XoT-Lock and a switch so that you can connect both of them.
- (Optionally) a DHCP server for the protected subnet, to give IPs to your protected devices.
Setup guide
- Connect the external side of the XoT-Lock you want to use to a network that has access to the XMS.
- Enroll the XoT-Lock if it is not already enrolled in the XMS.
- Make sure the XoT-Lock has a reasonable classification: Device type, group, and location settings that can later be targeted by a policy. This can be edited by navigating to the XoT under devices and clicking on the Access control tab.
- Put both devices in a switch that is connected to the protected side of the XoT-Lock. Make sure the devices exposes some sort of service that you can use to test access (e.g. HTTP/HTTPS/SSH/RDP).
- Either set static IPs for your devices on the same subnet, or have them get their IP settings from a DHCP server you have set up on the protected subnet.
- Configure the XoT-Lock in a multi-device configuration that matches your network setup.
- Create a policy which:
- Source: Type is set to a User Group which your client user belongs to.
- Destination: Device Type, Device Group and location settings match the classification of your XoT-Lock.
- How: The services you want to access are added to the Services list.
- Connect the client system to a network from which it can reach both the XMS and the external side of the XoT-Lock.
- Start the XoT-Desktop client and make sure that the user is selected in the top left dropdown.
- If everything has been set up correctly, the client will now get access to the device that is placed on the protected side of the XoT-Lock. You will see the status of this connection in the XoT-Desktop client.
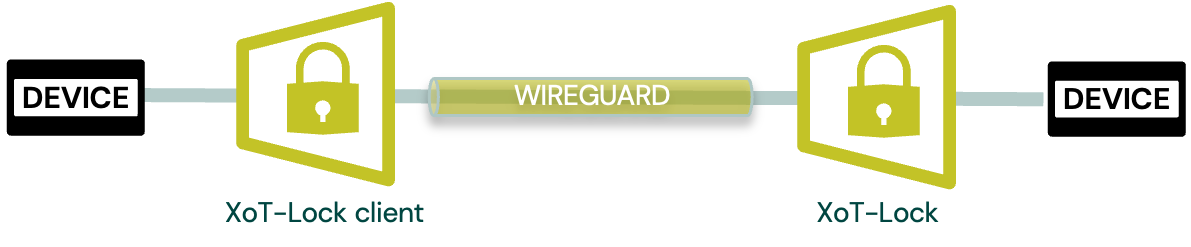
Device communicates with a single device
A device communicates to another device through two XoT-Locks in Single Device mode. Both devices retain their subnet membership in the mode of operation.
No XoT client software is installed on the devices, the XoT-Locks themselves handle the encrypted tunnels between each other.
Prerequisites
- Admin access to an XMS installation.
- Access to 2 XoT-Locks.
- A client system with the XoT-Desktop client installed and configured with a user present in the XMS.
- At least two devices that can be connected to the protected side of each XoT-Lock.
Setup guide
- Connect the external side of both XoT-Locks you want to the same network, which also has access to the XMS.
- Enroll both XoT-Locks if they are not already enrolled in the XMS.
- Make sure the XoT-Locks have reasonable classifications: Device type, group, and location settings that can later be targeted by a policy. This can be edited by navigating to the XoT under devices and clicking on the Access control tab.
- Put a device on the protected side of both the XoT-Locks.
- Configure both the XoT-Locks in a single device configuration.
- Create a policy where:
- Source: Type is set to Protected Device and the device classification matches one of your XoT-Locks.
- Destination: Type is set to Protected Device and the device classification matches the other XoT-Lock.
- How: The services you want to enable access for are added to the Services list.
- You should now have access from the device behind the XoT-Lock specified in your Source to the device specified in Destination. If you have only created one policy, the access will only go one way. If you want to enable communication in both directions, then the policy either needs to apply in both directions, or you need to create another policy where the source and destination values are swapped.
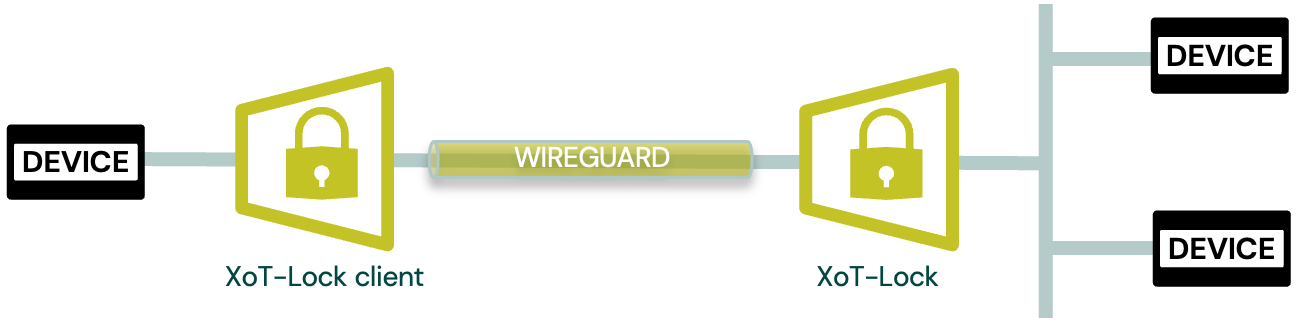
Device communicates with multiple devices
A device communicates from a XoT-Lock in Single Device mode to one or more devices through a XoT-Lock in Multi Device mode.
The network(s) behind the XoT-Lock in Multi Device mode is a subnet that needs to be configured on the XoT-Lock. VLANs are supported with multiple subnets as required.
No software is installed on the devices.
Multiple devices communicate with multiple devices
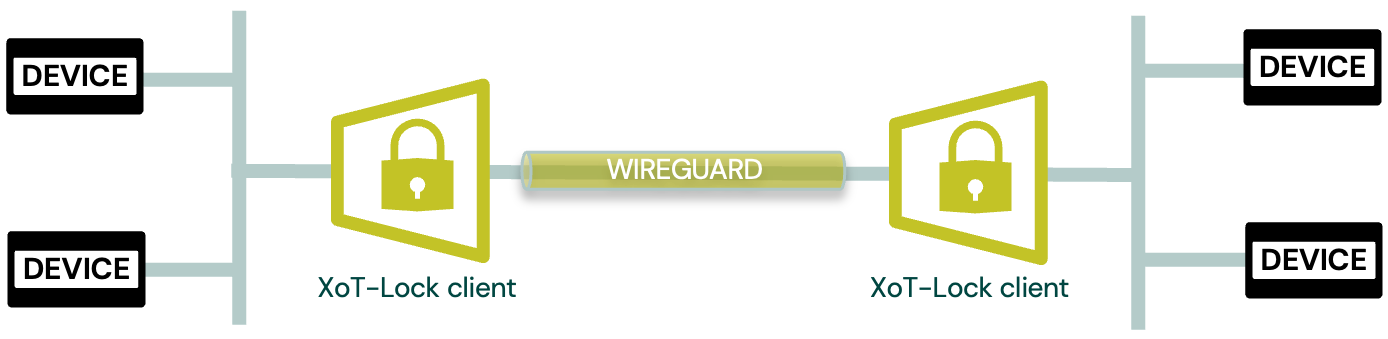
A device communicates from an XoT-Lock in Single Device mode to one or more subnets through a XoT-Lock in Multi Device mode. The network(s) on both sides of the XoT-Locks are subnets that need to be configured on the XoT-Locks. VLANs are supported with multiple subnets as required. No software is installed on the devices.
Prerequisites
- Admin access to an XMS installation.
- Access to 2 XoT-Locks.
- A client system with the XoT-Desktop client installed and configured with a user present in the XMS.
- Several devices can be connected to the protected side of each XoT-Lock.
- (Optionally) DHCP servers on the protected subnets, to give IPs to your protected devices.
Setup guide
- Connect the external side of both XoT-Locks you want to the same network, which also has access to the XMS.
- Enroll both XoT-Locks if they are not already enrolled in the XMS.
- Make sure the XoT-Locks have reasonable classifications: Device type, group, and location settings that can later be targeted by a policy. This can be edited by navigating to the XoT under devices and clicking on the Access control tab.
- Put at least one device on the protected side of each XoT-Lock.
- Either set static IPs for your devices on the same subnet, or have them get their IP settings from a DHCP server you have set up on the protected subnet.
- Configure the XoT-Lock in a multi-device configuration that matches your network setup.
- Create a policy where:
- Source: Type is set to Protected Device and the device classification matches one of your XoT-Locks.
- Destination: Type is set to Protected Device and the device classification matches the other XoT-Lock.
- How: The services you want to enable access for are added to the Services list.
- You should now have access from the devices on the subnet behind the XoT-Lock specified in your Source to the subnet behind the XoT-Lock specified in Destination. If you have only created one policy, the access will only go one way. If you want to enable communication in both directions, then the policy either needs to apply in both directions, or you need to create another policy where the source and destination values are swapped.