XMS Installation Manual
1. Introduction
Welcome to the XMS (XoT Management System) Installation Manual. This guide provides comprehensive instructions for installing and configuring XMS on your system. The primary installation method utilizes an interactive script, xms-setup.sh, designed to streamline the process by guiding you through configuration choices and automating the setup of various underlying components.
1.1 XMS Services Overview
XMS is architected as a collection of services, each running within its own Docker container. These services work together to provide the full functionality of the system and are managed collectively by a Systemd service named xms.
Understanding the key components can be helpful:
- The
nginxproxies incoming requests on behalf of public-facing XMS services: the user-facing dashboard, the backend APIs, and the authentication service, while also managing TLS terminations. - The
dashboardprovides the web-based graphical interface for administrators to manage XMS. xot-apiis the core backend service. It exposes the main XMS API used by the dashboard and potentially other clients, and it handles the primary business logic and database interactions.- Communication with connected devices is facilitated by the
mqttservice, which runs a Mosquitto MQTT broker. - User authentication and optionally identity management are provided by the
auth-apiservice, which runs an instance of Keycloak. - Certificate management for devices and clients is handled by the
ca-manager. This service can operate using an internal provider or integrate with external Certificate Authorities like Telia Cygate or Net iD Portal. - The
directory-syncsynchronizes users and groups from an LDAP source, into the internal XMS database used byxot-api. local-discoveryis an optional service that provides a way for XoTs to find the XMS in isolated setups where reaching the global discovery services is not an option.
Additionally, XMS may include supporting services like mqtt-metrics-collector, benthos (for message processing/logging), as well as an optional postgres service, which provides an internal database for setups that benefit from not having to communicate with an external database.
2. Prerequisites
Before proceeding with the installation, please ensure your environment meets the following requirements.
2.1 System Requirements
The host machine for XMS should meet these specifications:
- Hardware: A minimum of 2 CPU cores, 8 GB of RAM, and 60 GB of storage is recommended. XMS runs on
amd64/x86_64architecture. - Operating System: Ubuntu 22.04 LTS is the recommended platform. However, any modern Debian-based Linux distribution equipped with
systemdshould be compatible. - Essential Software:
- Docker Engine (
docker) for containerization. - Docker Compose (
docker compose) for managing the multi-container application. - Standard Linux utilities including
bash,sed,grep,awk,ip,mktemp,realpath,tr,head,cut, andopenssl. jq: This command-line JSON processor is required by setup scripts. Install it via your package manager (e.g.,sudo apt install jq).certbot: This tool is only necessary if you plan to use Let's Encrypt for obtaining TLS certificates.
Proper network configuration is crucial for XMS operation:
- IP Addresses: The host machine must have at least two distinct, static IPv4 addresses assigned to its network interfaces (verify using
ip addr). These can be internal private IPs if XMS operates behind a NAT device. One IP will serve the main XMS web interface and API (vianginx), while the other will be dedicated to the MQTT broker service. - DNS Records: You need two Fully Qualified Domain Names (FQDNs) configured in your DNS:
- An FQDN for the main XMS interface (e.g.,
xms.yourcompany.com), resolving to the IP designated for XMS. This will be configured asXMS_FQDN. - A separate FQDN for the MQTT service (e.g.,
mqtt.yourcompany.com), resolving to the IP designated for MQTT. This will be configured asMQTT_FQDN. - Firewall Rules: Ensure network traffic is allowed to the necessary ports:
- TCP Port 443: Must be open to the XMS IP for HTTPS traffic (web UI, API).
- TCP Port for MQTT: Must be open to the MQTT IP. The setup script configures port 443 by default in the
.envfile (MQTT_LOCAL_IF), but thedocker-compose.yamlinternally maps this to port 8883 for themqttcontainer. Ensure the port specified inMQTT_LOCAL_IFis accessible. - TCP Port 80: Required only on the XMS IP if using Let's Encrypt for certificate validation.
- TCP Port 22: Standard SSH port for administration. Access should ideally be restricted to trusted IP addresses.
2.3 External Database (Optional)
If you opt for an external database instead of the internal one provided:
- It must be PostgreSQL version 16.
- The
uuid-osspextension needs to be enabled within the target database. You can typically enable it by connecting to the database as a superuser and runningCREATE EXTENSION IF NOT EXISTS "uuid-ossp";. - Ensure the XMS host machine can establish network connections to your external database server.
2.4 Acquiring and installing XMS
Unless you have already acquired an XMS installation package, you will need to retrieve it from the Xertified APT Package Repository (APR). For this, you will need an account key. If you do not have an account key, please contact your Xertified representative for one.
Once you have the account key, you may set up the Xertified repository and start the installation of the XMS package by running:
wget https://share.xertified.net/install/xms_install_ubuntu_release.sh
chmod 750 xms_install_ubuntu_release.sh
./xms_install_ubuntu_release.sh
You may of course simply download this script and inspect it before executing it, to verify the changes it will perform on your system.
You will be prompted for your account key. Once you have pasted a valid account key, a client certificate will be issued and downloaded so that you have access to the Xertified APR for package installation and updates.
The XMS installation should start automatically.
3. XMS Setup and Configuration
The installation is primarily driven by the interactive xms-setup.sh script.
- Navigate to the XMS Directory: Open a terminal and change to the program directory.
bash
   cd /usr/share/xms
- Execute the Setup Script: Run the main setup script.
bash
   ./xms-setup.sh
3.1. The XMS Setup Main Menu
Running the setup script will present a main menu :
 XMS Configuration and Setup Tool
─────────────────────────────────
 Main menu
 > Configure XMS
   Print full system status
   Exit
You will interact with this menu using your arrow keys and Enter.
- Setup Notice: If essential prerequisites are missing, then the script will display a notice explaining why the
Start setupoption is currently unavailable. Configure XMS: This option guides you through setting the necessary parameters for your XMS instance. This is the mandatory first step for new installations.Start setup: Once the configuration is complete and validated, this option becomes available. Selecting it initiates the automated installation and setup of all XMS components.Print full system status: This runs thescripts/get-status.shscript to display a detailed report of the current configuration, credential status, and Keycloak state. It's useful for verifying settings or diagnosing issues.Exit: Closes the setup script.
3.2. Configuring XMS (Configure XMS Option)
Selecting Configure XMS starts an interactive session where you provide essential details about your deployment environment. The script will prompt you for the following information:
- XMS FQDN: The primary domain name for accessing the XMS web UI and API (e.g.,
xms.yourcompany.com). - XMS IP: The specific local IP address on the host machine that the Nginx service should bind to for the XMS interface.
- MQTT FQDN: The domain name dedicated to the MQTT service (e.g.,
mqtt.yourcompany.com). - MQTT IP: The local IP address for the MQTT service. This must be different from the XMS IP.
- Database Type: Choose between
Internal(uses the bundled PostgreSQL container) orExternal(connects to your existing PostgreSQL 16 instance). - Database URL: If you selected
External, provide the FQDN of your PostgreSQL server. - TLS Certificate Source: Select how the main TLS certificate for Nginx will be obtained:
Let's Encrypt(automatic, requires public access),Generate self-signed(creates a local certificate, causes browser warnings), orFile(uses your pre-existing certificate and key). - Certificate Path / Key Path: If you chose
File, provide the full paths to your certificate and private key files. - User Source: Determine where user identities originate:
Keycloak(uses the internalauth-apiservice) orMicrosoft Entra ID(requires additional Azure and Keycloak configuration later). - Automatically create an initial XMS user? Choose
Yesto have the script create a defaultxmsadminuser, orNoto manage users manually after setup.
After gathering this information, the script displays a summary. Confirming this summary applies to the configuration by:
- Updating the main environment file (
.env) with your specified FQDNs, IPs, and database settings. - Saving choices like TLS source and initial user creation preference to
.config. - Managing the
docker-compose.override.yamlfile (renaming it with or without a leading dot) to enable or disable the internal PostgreSQL service. - Copying the correct template (
kc-application.yamlorazure-application.yaml) toconfig/directory-sync/application.yamlto configure thedirectory-syncservice based on your chosen User Source.
The script will then restart, displaying the updated configuration status, and the Start setup option should now be available if all prerequisites are met.
3.3 Configuring external CA (optional)
By default, XMS will be configured to use an integrated Certificate Authority which requires minimal configuration. However, if you want to connect XMS to an external CA this will require some additional configuration steps.
3.3.1 Cygate CA Configuration
If you want to use Telia Cygate as your CA provider instead of the integrated CA, please edit the configuration file at /etc/xms/config/env and set CA_TYPE=CYGATE in your env config and configure CYGATE_URL and CYGATE_ISSUER appropriately.
In addition, the following files, provided by Telia Cygate, need to be placed in the /etc/xms/secrets/ca-manager/ directory.
cygate-issuer.pem The x509 certificate of the CA signing all end-entity certificates.
cygate-issuer-ca.pem The x509 certificate of the root CA that has signed cygate_issuer.pem.
cygate-ra.pem The x509 client certificate, used for authenticating the XMS towards Cygate's API.
cygate-ra-key.pem The private key, corresponding to cygate-ra.pem.
3.3.2 Net iD Portal Configuration
If you are using Net iD Portal for your CA provider, i.e., have CA_TYPE=NIP in your env config, then you will also configure the two NIP-specific settings. NIP_FQDN is the fully qualified domain name for your Net iD Portal installation. Set SECMAKER_PW to the password for your .pfx file for your Net iD Portal API certificate for your XMS installation.
For more detailed instruction in how to set up Net iD Portal or to acquire these credentials please consult the Net iD Portal manual.
3.4. Performing the Setup (Start setup Option)
Selecting Start setup triggers the automated installation process, which executes the following steps in sequence:
- Start Keycloak Service: Verifies the
auth-api(Keycloak) container is running usingscripts/start-auth-api.sh, as subsequent steps depend on it. - Check System Status: Runs
scripts/get-status.shinternally to get the current state of credentials and Keycloak configuration. - Configure Keycloak: If the status check indicates the Keycloak realm isn't set up (
KEYCLOAK_REALM_STATUSis not 'OK'), it runsscripts/keycloak-setup.sh. This script (scripts/keycloak-setup.sh) configures thexmsrealm within Keycloak, creates a dedicated Keycloak administrator user (xadmin), removes the initial bootstrap administrator, and securely stores thexadmincredentials insecrets/keycloak/admin-credentials. - Issue Service Certificates: This script
(scripts/issue-service-certificates.sh)utilizes theca-managerservice (temporarily started viascripts/start-cert-service.sh) to generate the necessary certificates for internal communication between XMS services. - Handle TLS Certificate: If the main Nginx TLS certificate is missing or invalid, the setup tool takes action based on the
TLS_SOURCEsetting from your configuration: Let's Encrypt: Executesscripts/setup-letsencrypt.sh(requires root privileges) to obtain a certificate usingcertbot.Generate self-signed: Runsscripts/create-self-signed-tls-cert.shto create a self-signed certificate and key insecrets/ssl/.File: Copies the certificate and key files you specified during configuration intosecrets/ssl/.- Create Initial XMS User (Optional): If you chose
Yesduring configuration, the script performs these actions: - Calls
scripts/keycloak-create-user.shto create thexmsadminuser in Keycloak, setting a random password. - Saves the generated username, password, and email to
secrets/keycloak/xms-user-credentials. The password will also be displayed clearly on the screen - Runs
scripts/xms-set-user-role.shto ensure thexmsadminuser is synchronized to the XMS database and assigns therootrole, granting administrative privileges. - Set File Permissions Again: Runs
scripts/set-permissions.shto ensure all files have correct permissions. - Finalize and Start: Setup will enable the
xmsSystemd service to start automatically on system boot (systemctl enable xms), and then start (or restart) the complete XMS application stack (systemctl restart xms). - Display Completion Message: Finally, the script provides feedback on the setup outcome. If successful, it may include login instructions (especially if the initial user was created) or reminders about next steps (like configuring Azure AD sync or accessing Keycloak manually). If errors occurred, the output will show this. Please consult the troubleshooting section 7 if you have any such issues.
4. Post-Installation Checks
After the xms-setup.sh script completes, it's recommended to perform a few checks to ensure everything is running correctly:
- Verify Systemd Service: Check the status of the main XMS service.
bash
   systemctl status xms
It should show as active (running).
- Inspect Docker Containers: List the running containers managed by Docker Compose.
bash
   docker ps
Key services like nginx, auth-api, xot-api, directory-sync, mqtt, dashboard, and potentially postgres should all be listed with a status of running or healthy. If any of them are continuously restarting, you may check the logs of that service using docker compose logs \
-
Access the Web Interface: Open a web browser and navigate to the XMS FQDN you configured (e.g.,
https://xms.yourcompany.com). You should be redirected to the XMS login page. If you used a self-signed certificate, you might need to accept a security warning in your browser. -
Attempt Login: Try logging in. If you opted for automatic user creation, use the
xmsadminusername and the password displayed during setup (also saved insecrets/keycloak/xms-user-credentials). If using an external identity provider like Azure AD, you should be redirected to its login page.
5. Users and Authentication
User management in XMS involves interactions between Keycloak (the auth-api service), the directory-sync service, and the XMS application database. Keycloak either handles the authentication itself, or makes use of an identity provider (see 5.4), while directory-sync copies user information (for users belonging to groups designated to sync) into the XMS database, where roles and permissions are assigned.
A root User can set user permissions using the XMS admin web interface. This does not solve the problem of getting an initial user with privileges. The setup can do this for you, but there are also ways of doing this manually, which are described below.
One key distinction is whether the user source is Keycloak or Microsoft Entra ID (previously Azure AD).
If you are using Keycloak as your user source, the steps 5.1 and 5.2 will describe alternative steps for creating and importing users via Keycloak.
If you are using Microsoft Entra ID as your user source, 5.4 describes how to set up Keycloak to authenticate with Microsoft, and Appendix A below will describe how to set up the user synchronization.
You will still need to assign a role for at least one user (so that it can be given access to the Admin web interface and assign permissions for other users), for this, you will still need to check section 5.3.
5.1. Manual User Creation via Keycloak UI
The XMS setup tool may have already created a user for you if you selected that when configuring your installation. If so, you may
If you need to add users beyond the optional initial admin, or if you chose not to create the initial user automatically, you can use the Keycloak administration console:
- Retrieve Keycloak Admin Credentials: The setup script creates a dedicated Keycloak administrator (
xadmin). Find its credentials in the XMS installation directory:
bash
   cat /etc/xms/secrets/keycloak/admin-credentials
Note the ADMIN_USERNAME and ADMIN_PASSWORD.
-
Access the Console: Navigate your browser to
https://<Your_XMS_FQDN>/idpand click theAdministration Consolelink. -
Log In: Use the
xadminusername and password. -
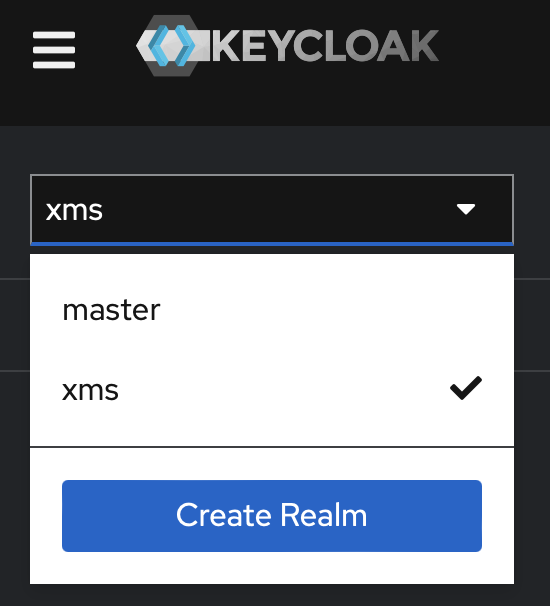
Switch to the XMS Realm: Upon login, you'll be in the
masterrealm. Use the dropdown menu in the top-left corner to select thexmsrealm. Perform all XMS user management within thexmsrealm.
-
Create Groups: You can create groups via the
Groupsmenu. It is convenient to create groups first since you can then assign group membership directly when you subsequently create users. -
Create the User: Navigate to
Usersand clickAdd user. Fill in the username and any other desired details. Make sure to assign at least one Group membership. This can be done both during user creation and after via the Groups tab. A user must belong to at least one group to be synchronized bydirectory-sync. -
Set the User's Password: Go to the
Credentialstab for the newly created user and use theSet passwordoption. EnsureTemporaryis off if you want the password to be permanent.
5.2. Using keycloak-create-user.sh Script Manually
If you don't want to bother with manual creation via the Keycloak web interface, you can use the Keycloak user script to create users.
-
What it Does: This script interacts with Keycloak (using the admin credentials configured and stored during setup) to create a user and assign them to a specified group (defaulting to
Admins). -
What it Doesn't Do: It does not set the user's role within the XMS application database. See the next section for how to do that.
-
Usage:
cd /usr/share/xms/scripts
# Create a user named 'operator1' in group 'Operators' with a password
./keycloak-create-user.sh --username 'operator1' --group 'Operators' --password 'ComplexP@ss!' --email 'op1@domain.tld'
- Crucial Next Step: After successfully running
keycloak-create-user.sh, you must runscripts/xms-set-user-role.sh(as described in Section 5.2) to assign an XMS role (e.g.,user,admin) to the newly created user. Without this step, the user will likely be unable to log in or perform actions within XMS.
5.3. Setting User Roles in XMS (xms-set-user-role.sh)
Once a user is created in Keycloak and assigned to a group, the directory-sync service will eventually copy their details into the XMS database. However, they initially receive the role none, which prevents login to the web interface. You must assign a meaningful role for a user to have any access.
If you have a root user with access to the Admin interface, the correct way of changing user roles is to log into the XMS and change the role. Navigate to the Users list, click on a user, and select it in the XMS Access drop-down menu.
However, if you do not have a working account, you can do this via a utility script.
- Navigate to the Program Directory:
bash
   cd /usr/share/xms
- Execute the Script: You need to identify the user (either by their email address/UPN or their unique Keycloak User ID) and specify the desired role.
```bash # Example: Grant 'root' role to user 'admin@example.com' scripts/xms-set-user-role.sh --email admin@example.com --role root
# Example: Grant 'user' role to user with ID 'f4a5b1c2-...' scripts/xms-set-user-role.sh --userid f4a5b1c2-d3e4-f5a6-b7c8-d9e0f1a2b3c4 --role user ```
- Available Roles:
none,user,admin,root. Therootrole typically grants full administrative privileges. -
The script handles starting the
directory-syncservice if needed and waits for the user to appear in the database before attempting the update. It will handle both internal and external PostgreSQL databases, but if you are using an external database, make sure to have psql installed on the system. -
Manual Database Update (Alternative/Verification): If necessary, you can update the role directly in the database:
-
First, find the user's Keycloak ID (visible in the Keycloak UI URL when viewing the user, or by querying the
userstable in the XMS database byupn). - Connect to your XMS database (use
docker compose exec postgres psql ...for internal, or your preferred SQL client for external). - Execute the SQL command:
UPDATE users SET role='<ROLE>' WHERE id='<USER_ID>';(replace<ROLE>and<USER_ID>).
5.4 External Identity Providers
NOTE This section can be skipped if you are using local users in Keycloak. It is only relevant if you want to set up an external identity provider (e.g., Azure) and have your users authenticate with that service instead. Keycloak will then act as a relay between the user and the external identity provider instead of authenticating the user itself.
For information on how to synchronize users with Azure, see Appendix A below.
Keycloak supports various Identity Providers, and the most widely used protocol is OpenID Connect.
You can create an OIDC provider by accessing the Keycloak Administration Console, selecting the xms realm and then navigating the Identity Providers in the Configure section of the menu.
Select OpenID Connect v1.0 and you can start creating your provider.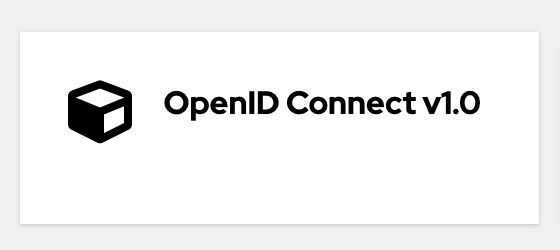
If you want to use Azure, see Appendix A, on how to set up the appropriate app registrations. If you are going this route then the discovery endpoint should be listed in your app registration detail.
Make sure to fill out Client ID and Client Secret, and add the Discovery endpoint. Example:
The ID in the JWKS URI is your Directory/Tenant ID found here:
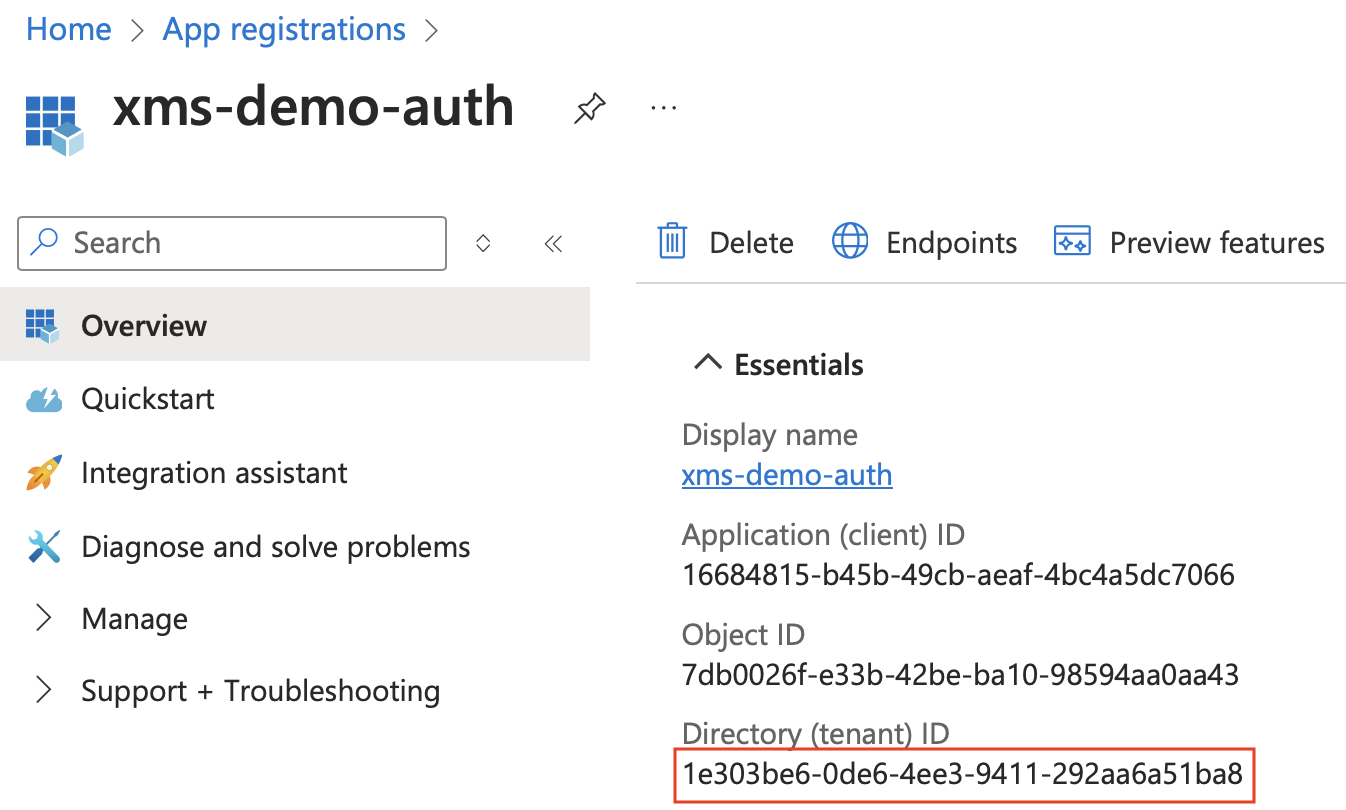
Fill it out like this:
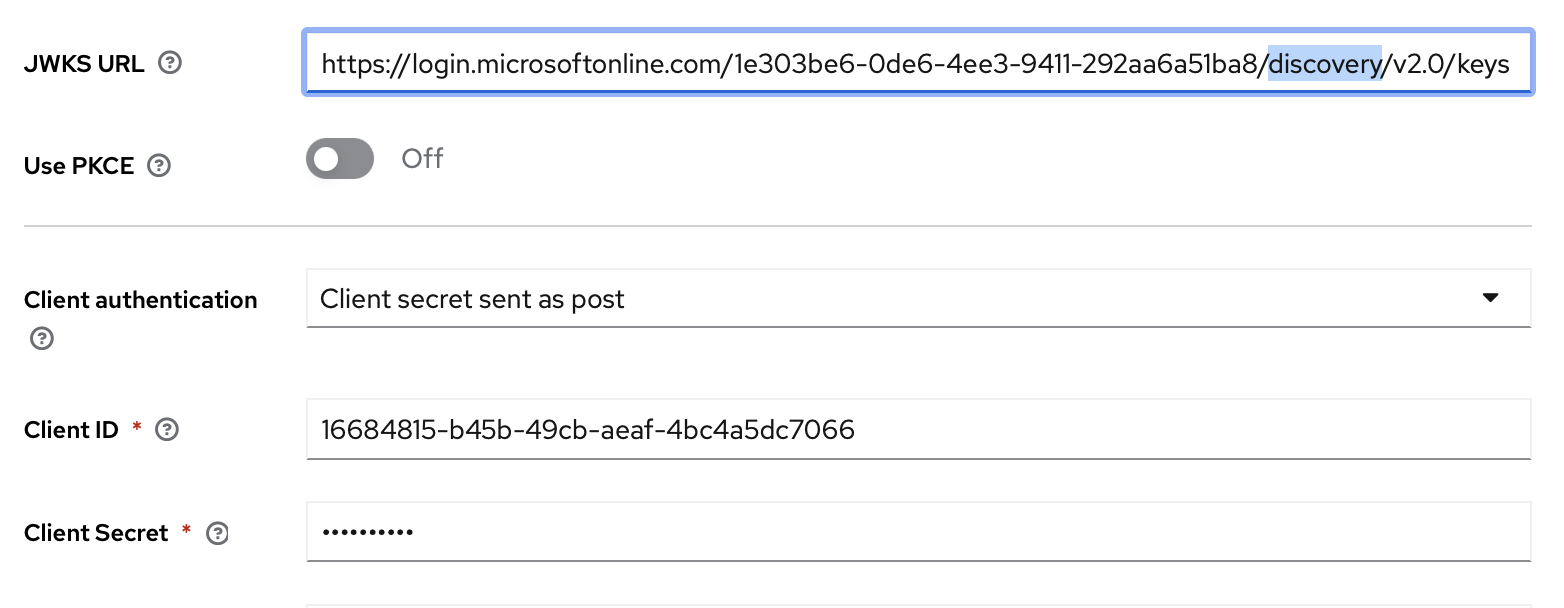
After you have created your provider, you will need to edit some things to make it compatible with XMS. Make sure you have selected your newly created identity provider. And then:
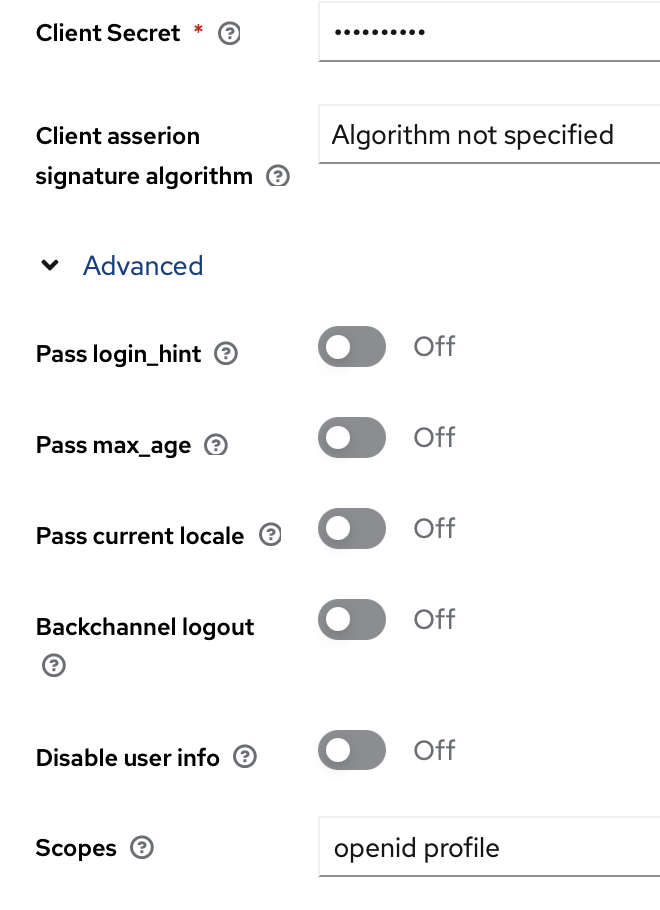
- Add the following free-text in the "Scopes" field under the "Advanced" expandable menu:
openid profile
-
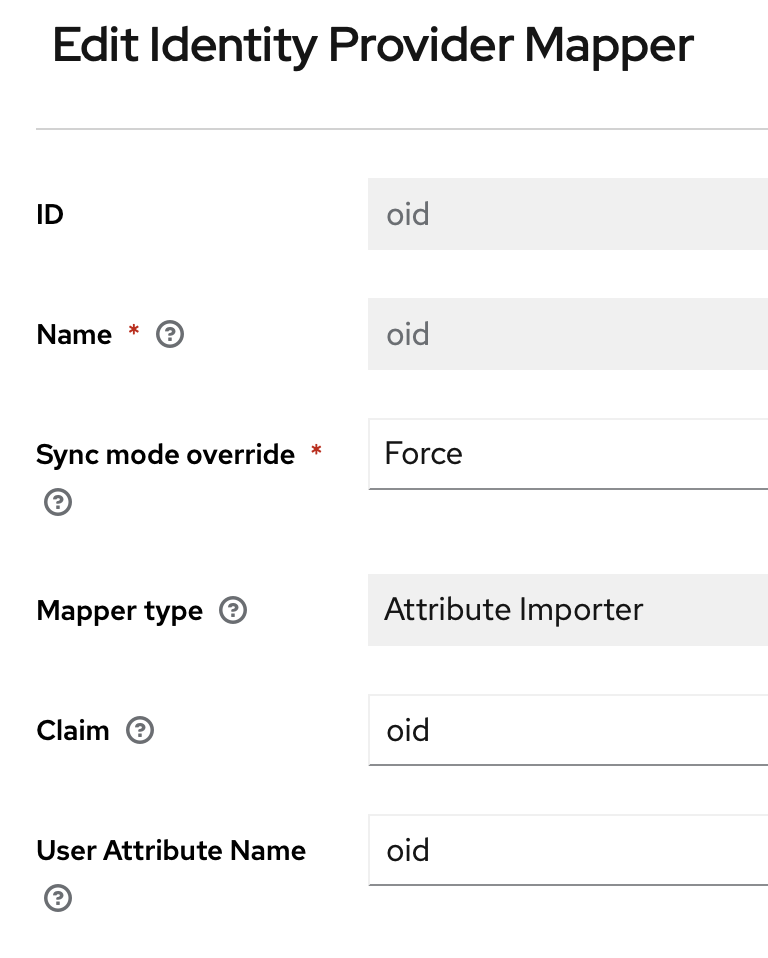
Add a mapper, by going to the Mappers tab and then clicking Add mapper, then fill out:
-
Give it the name oid
- Change Sync mode override to Force
- Select Mapper type to Attribute Importer
- Set Claim to oid
- Set User Attribute Name to oid
This will make sure that the Identity Provider returns all the information that we need and that the relevant id property has the name that XMS will expect.
Here are some samples:
4.6.5 Keycloak Login Theme
The login theme determines how the login screen the user will see when logging into XMS will look. Please observe, if authentication is set up to use an external provider while having the default theme with username and password fields, it may cause the user to provide their login credentials for the external service (e.g., Microsoft) to Keycloak. When an external identity provider is used, the login screen should simply be a redirect button that bounces the user to the identity provider. Then the user will only give their login credentials to this external service.
If you are authenticating with users in Keycloak, then you can simply leave the Login theme to its default value of keycloak.
However, if you are using an OIDC provider to authenticate users, you should set the login them.
To set the login theme you first access the Keycloak Administration Console. Select the Realm xms in the top left dropdown menu, then select Realm settings (in the Configure section). Then go to the Themes tab, and if you are using an external login provider, change it to xertified.
NOTE: When changing the login theme, make sure that you have the XMS realm selected in the top left dropdown, and not master. Changing the login theme for the master realm will break admin access!
6. Additional Configuration and Hardening
Beyond the core setup, consider these optional configurations:
6.1. Benthos Configuration
The benthos service can be used for processing or forwarding MQTT messages. If enabled, ensure its configuration file (/usr/share/xms/config/benthos/benthos.yaml) contains the correct MQTT password. Locate the password fields within the MQTT input/output sections and set their values to match the MQTT_XMS_PASSWORD defined in your .env file.
6.2. Nginx IP Access Control
To enhance security, you can restrict access to certain parts of the XMS interface based on the client's IP address. Edit the following files within /usr/share/xms/config/nginx/:
access-admin.conf: Controls access to the most sensitive areas, including the Keycloak admin console (/idp/admin/*). Add lines likeallow 192.168.1.100;for each trusted administrator IP address. To enforce the restriction, uncomment thedeny all;line at the end of the file.access-restricted.conf: Governs access to other application paths that might require restricted access (as defined in the mainnginx.conf). IPs allowed inaccess-admin.confare automatically included. Add specificallowlines if needed for other trusted networks or IPs. Uncommentdeny all;to enforce.
After modifying these files, apply the changes by reloading the Nginx configuration:
cd /usr/share/xms
docker compose exec nginx -s reload
6.3 Removing Stored Keycloak Credentials
The XMS setup script saves credentials for both Keycloak admin accounts and XMS user accounts to /etc/xms/secrets/keycloak. The admin credentials are used by scripts to access Keycloak and do further configuration. Once you are done with the setup, it is advised that the credentials stored here are copied into a secure credential management system and then removed from this directory. These files are not needed during operation; however, once they are removed, Keycloak/user scripts will no longer be able to function.
7. Troubleshooting
If you encounter issues during installation or operation it is encouraged to see if the steps below here alleviates the issue before contacting the support.
7.1 Installation Issues
Use the Status Script: The most valuable first step is often running scripts/get-status.sh directly from the /usr/share/xms/scripts directory. It provides a comprehensive snapshot of your configuration, credential validity (checking CNs against FQDNs), and Keycloak setup status. Use scripts/get-status.sh --all for the full report. While this will not be able to tell everything that could be wrong, it is a good idea to start with this and see if something obvious is missing or in an invalid state.
Run Scripts Directly for Verbose Output: The main xms-setup.sh script does not provide verbose logging from the sub-scripts it calls. If a specific step fails (e.g., "Keycloak setup failed," "Service certificate issuance failed"), navigate to /usr/share/xms/scripts and run the relevant script directly (e.g., ./keycloak-setup.sh, ./issue-service-certificates.sh, sudo ./setup-letsencrypt.sh). This may provide much better information on what specifically has gone wrong.
Initial User Creation: If the automated user creation during setup fails, try the manual script approach: run ./scripts/keycloak-create-user.sh followed by ./scripts/xms-set-user-role.sh --email <user_email> --role root.
7.2 General Operational Issues
Check Service Status: The first step to debugging operational errors is to see if all component services are running properly. Use docker compose ps to check for containers that are unhealthy, restarting, or stopped unexpectedly.
Check Logs: If you have services failing, check the logs for that specific service. You can examine the general Systemd service logs (journalctl -u xms) as they should contain everything, but in cases where a specific service is failing, it may be easier to check the logs for that service only via the Docker CLI using docker logs <service_name> (e.g., docker compose logs auth-api, docker compose logs xot-api, docker compose logs directory-sync, docker compose logs postgres). Please note that you can drop the compose and instead invoke docker logs <service_name>, but if you do, you have to specify the full service name, e.g., xms-xot-api-1, and not just the name as it appears in the service description.
Missing files or possible permission Issues: If a service encounter issues with files that it is unable to find or read, but the get-status.sh script does not indicate missing files? The first thing to do then, is to run the permission script /usr/share/xms/scripts/set-permissions.sh which will set the correct permission for files provided to the docker containers which may correct the issue.
Verify Configuration: Double-check your network settings (DNS resolution using dig <fqdn>, IP address assignment using ip a, firewall rules). Review the settings in /usr/share/xms/.env and/usr/share/xmsms/.config` for typos or inconsistencies.
User Synchronization and Login Problems:
- Confirm the user exists within the
xmsrealm in the Keycloak Admin Console. - Verify the user is assigned to at least one group in Keycloak. Users without group membership are ignored by
directory-sync. - Examine
directory-synclogs for errors related to connecting to Keycloak, the database, or processing specific users/groups. - Check
xot-apilogs for authentication or authorization errors when the user attempts to log in or perform actions. - Confirm the user's XMS role is correctly set (not
none) usingscripts/xms-set-user-role.shor by checking theuserstable in the database.
Appendix A - Integrating with Azure
If you want to integrate with Azure for authentication and/or user synchronization, you will need to create "App registrations" in Azure to allow XMS access to relevant resources.
Authentication
Create a new app registration
In Azure Portal, go to App registrations and click New registration, and add a name, e.g., "xms-auth"
In Supported account types, select ‘Accounts in this organization directory only' (Single tenant)
- For Redirect URI, select platform WEB and enter the URL in the form:
Take note of the client ID
After creation, please note the Application (client) ID for the created app registration, as this will be used later when configuring XMS. Example: 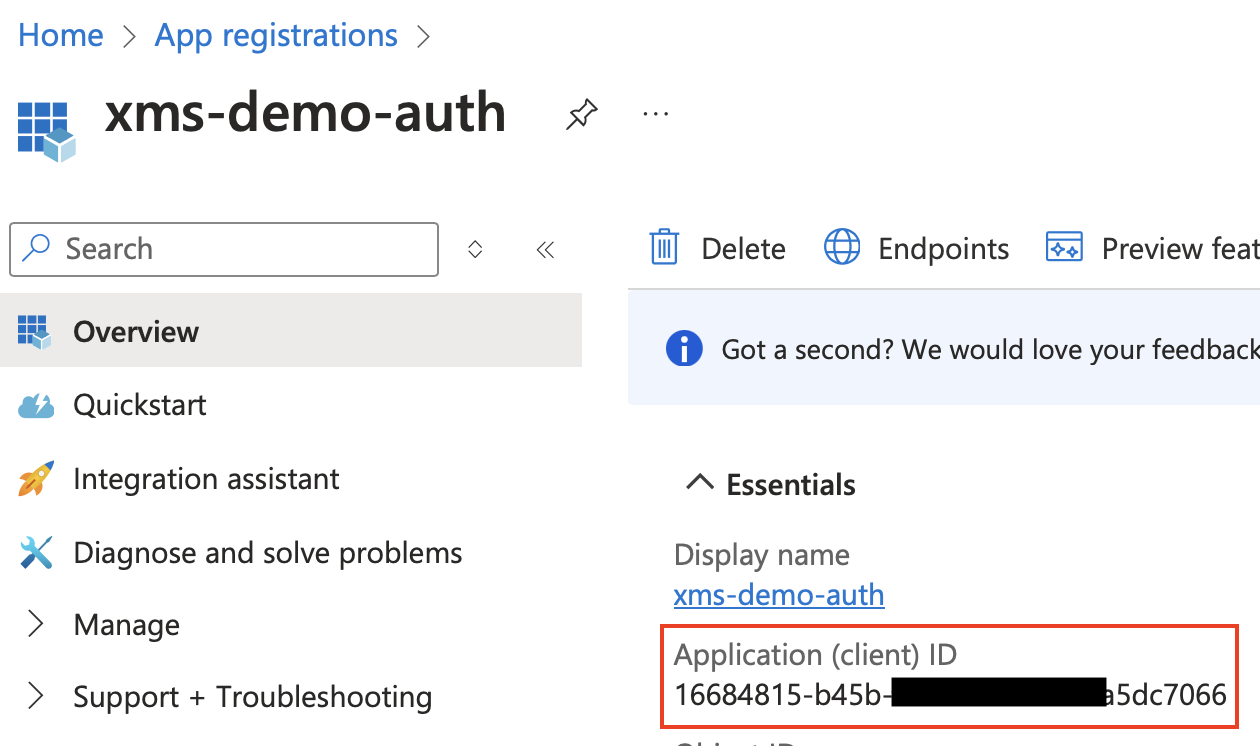
Add the redirect URI
For Redirect URI, select platform WEB and enter URL in the form: https://<XMS-FQDN>/idp/realms/xms/broker/oidc/endpoint. Example: 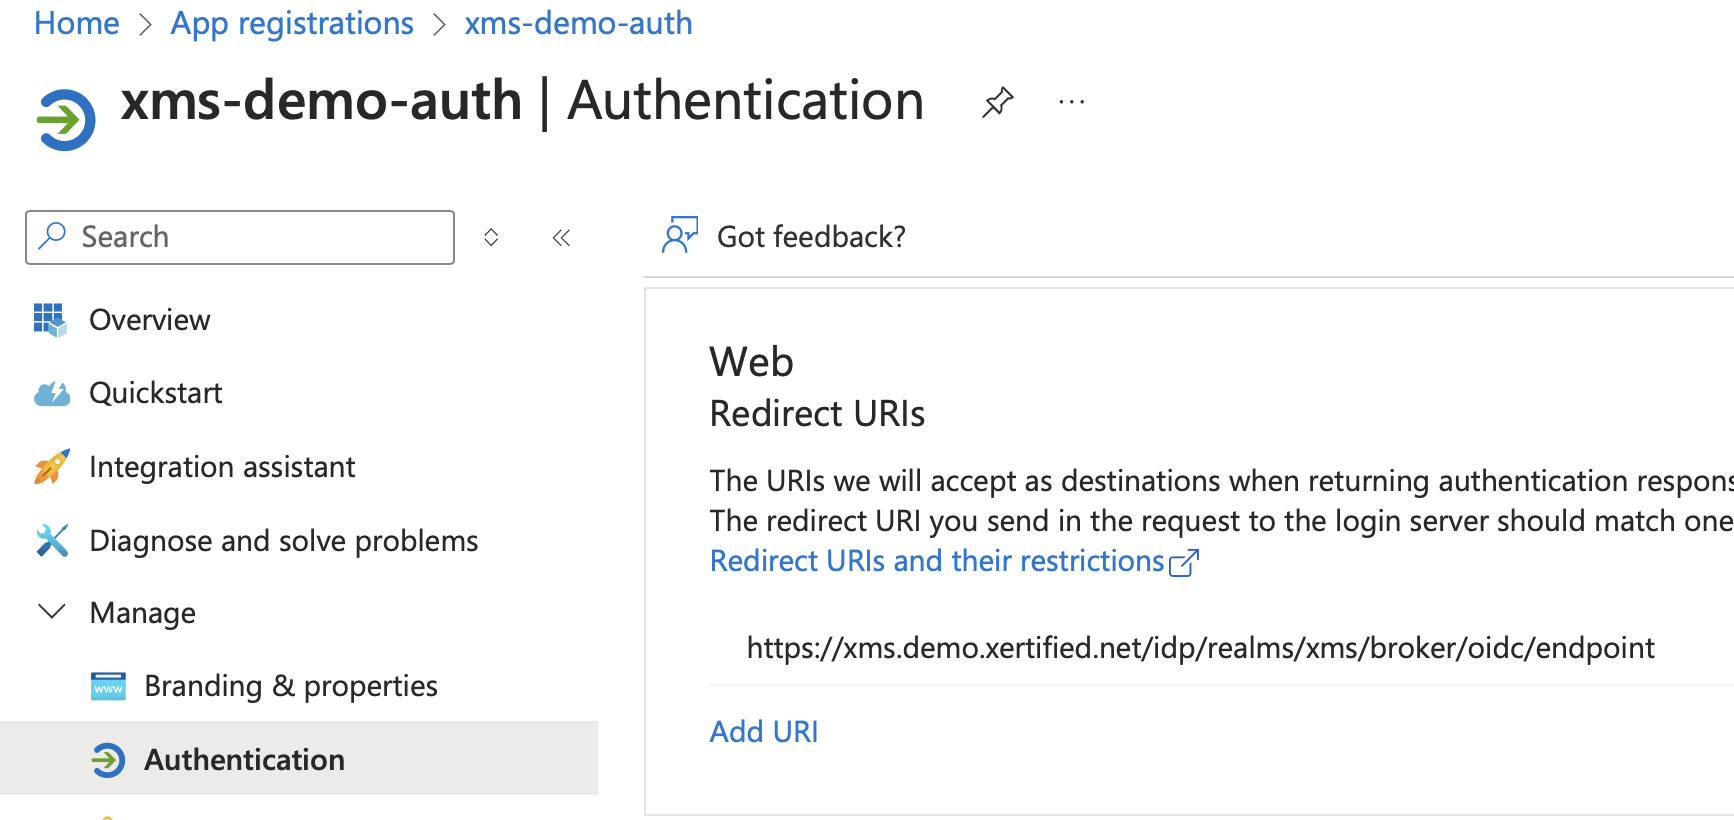
Add new client secret
While still in the created app registration, select ‘Certificates & secrets’ in the side panel.
Click New client secret and create a new app secret. Record the value of the secret once it is created. It will not be possible to extract this value later. So if it is lost, a new secret will have to be generated and configured in XMS.
Example: 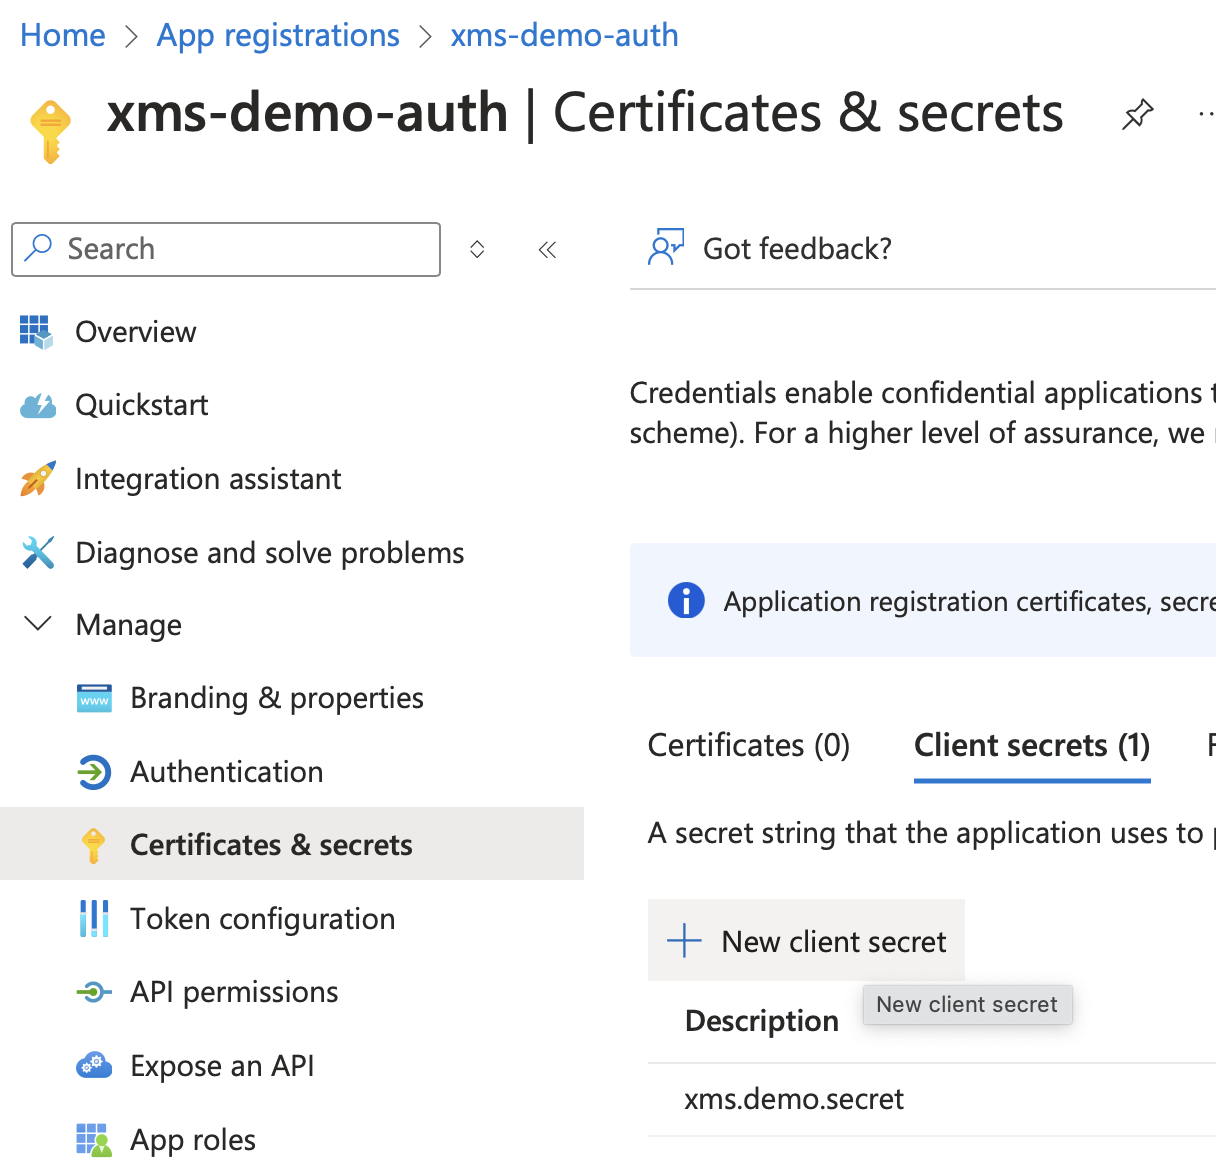
User Synchronization
Create a new app registration
- Navigate to Azure Active Directory, App registrations, and click New Registration
- Enter a name e.g. "xms-user_sync" and select Accounts in this organizational directory only (recommended) or Accounts in any organizational directory.
- Leave the Redirect URI empty
Set permissions
Under the App registration you just created, navigate to API permissions in the side menu.
-
Click on Add new permission > Microsoft Graph > Application permissions
-
Search for the permissions in the search bar
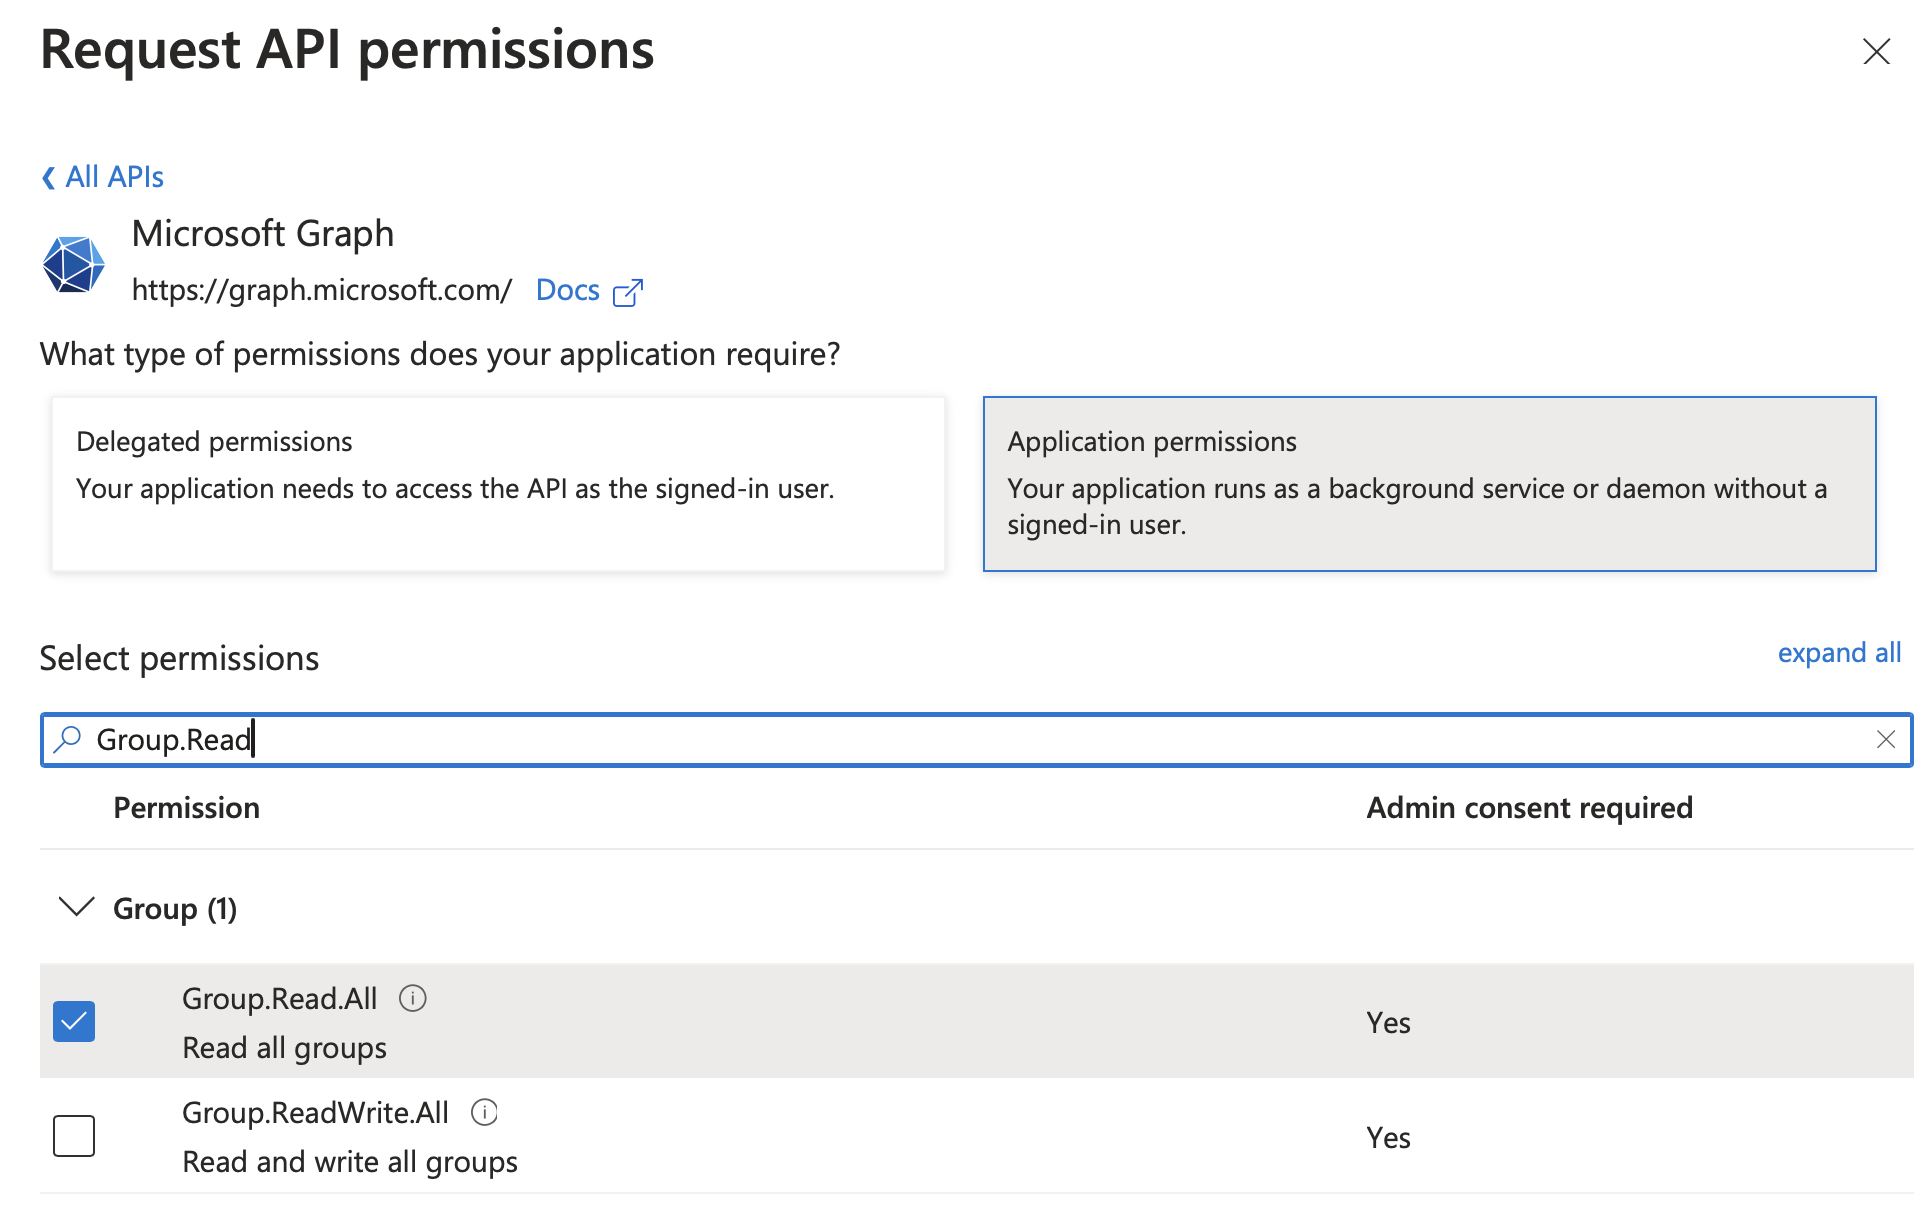
-
Add permissions: User.Read.All, Group.Read.All
-
Optional: Remove the default permission "User.Read"
-
IMPORTANT! Click on: "Grant admin consent for
" button.
It should look like this when done:
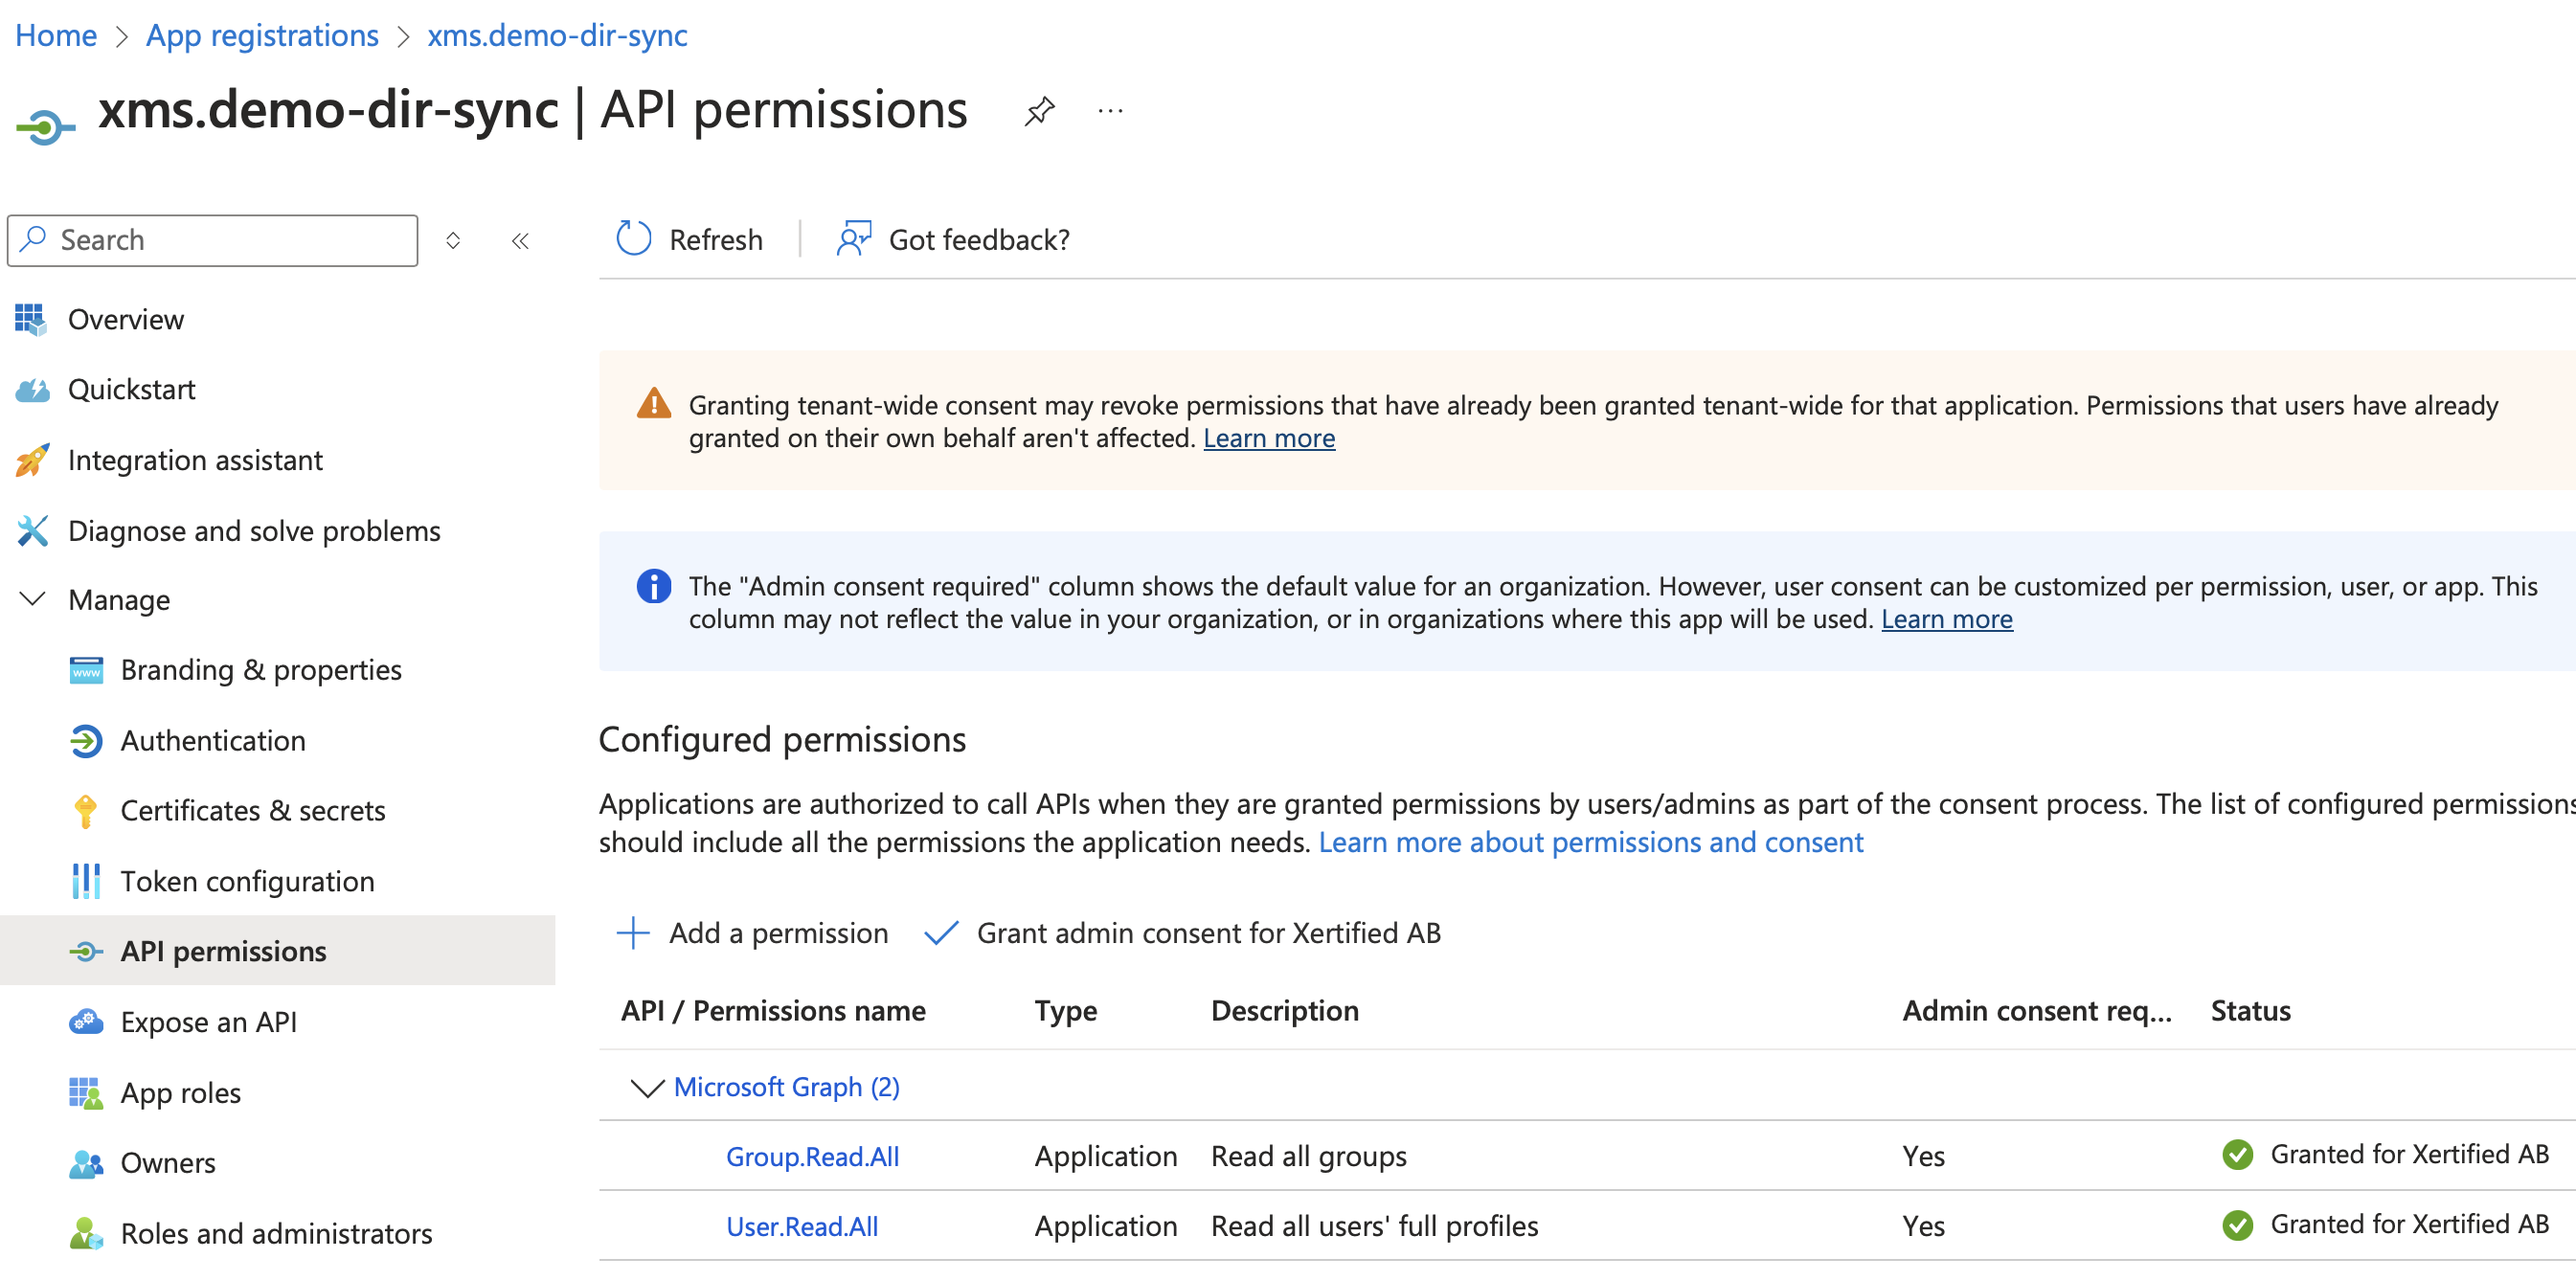
Directory synchronization configuration
Go to "App registrations" -> -> Certificate and secrets.
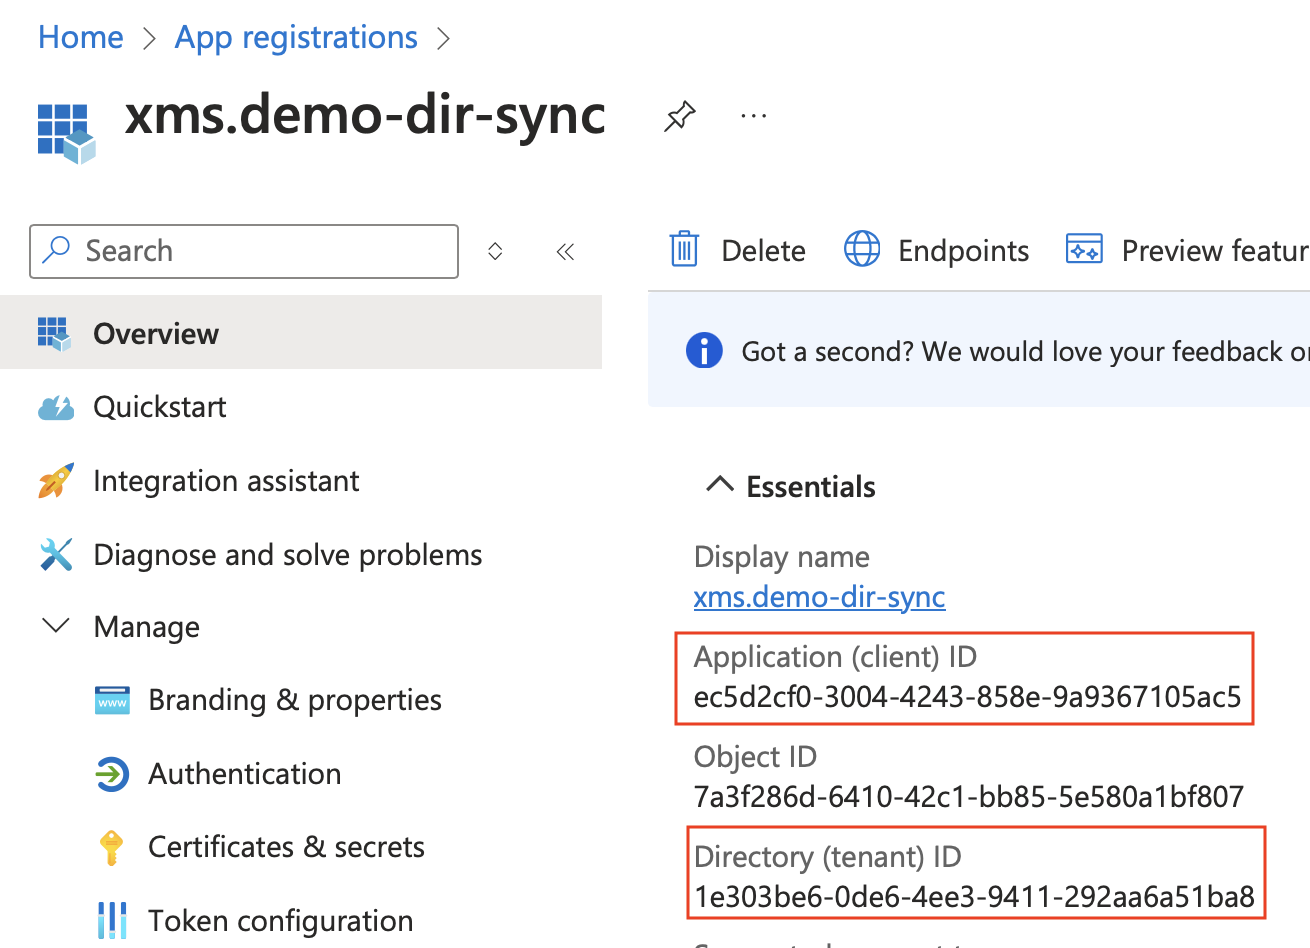
Edit the YAML configuration file for directory sync at /etc/xms/config/directory-sync/application.yaml
In the configuration file, update config.repository.graph.authentication:
-
Set ‘public-client-id’ to Application ID from above.
-
Set ‘authority’ to "login.microsoftonline.com/"
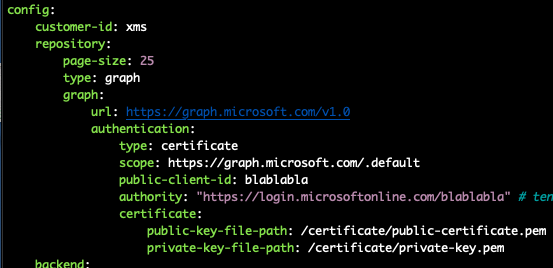
Certificate Authentication
To synchronize users and groups with Azure we need some keys and certificates created. You need to generate your certificate with OpenSSL. The private key must be in PKCS#8-format with no password. You can change the expiration time of the certificate depending on your needs.
The following example can be used as-is.
Creating certificates on the XMS server
Generate private key and public certificate for 3650 days (or 10 years): sudo openssl req -x509 -days 3650 -newkey rsa:2048 -keyout /etc/xms/secrets/directory-sync/private-key-with-pass.pem -out /etc/xms/secrets/directory-sync/public-certificate.pem
Now you must remove the password so convert private key with password to PKCS#8 with no password: openssl pkcs8 -topk8 -nocrypt -in /etc/xms/secrets/directory-sync/private-key-with-pass.pem -out /etc/xms/secrets/directory-sync/private-key.pem
Move the private key with a password to another location for safekeeping.
Edit the /etc/xms/config/directory-sync/applications.yaml file as root and make sure that the certificates there match the ones just created. They should have /certificate/ as in the example below.

/etc/xms/config/directory-sync/applications.yaml:
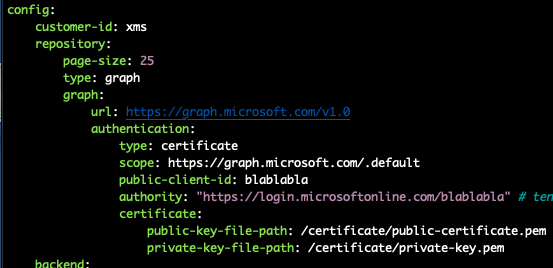
Upload public certificate to Azure
First, download the public-certificate.pem to your workstation.
To do this, you can use the "scp" terminal app on Windows or macOS. Here is the syntax from a Windows PowerShell or a macOS terminal that will copy the certificate to the current local directory. Launch a terminal and type: scp <user>@<xms fqdn>:/etc/xms/secrets/directory-sync/public-certificate.pem .
Now Go to "App registrations" -> name- -> "Certificate and secrets"" in the Azure portal and click on "Certificates" and upload your "public-certificate.pem"" by pressing "Upload certificate" and choosing the file.
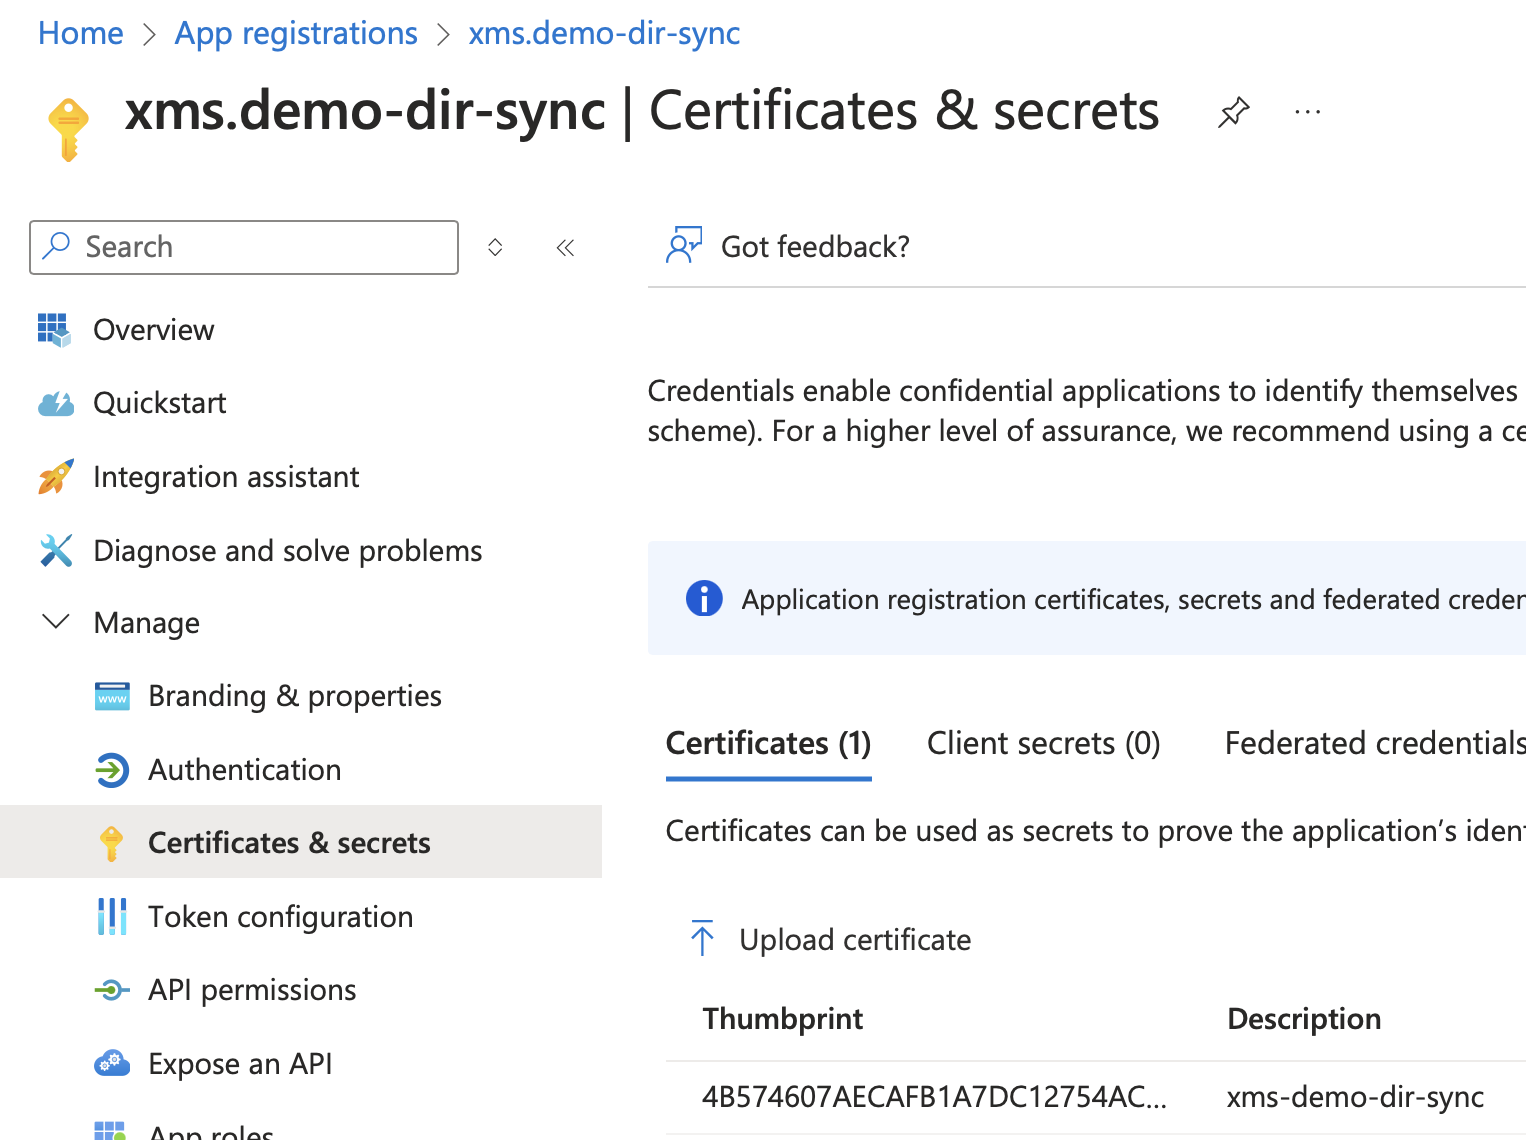
To finish, the directory.sync container needs to be restarted:
sudo docker restart xms-directory-sync-1
Add what groups that should be synchronized
Only users who belong to a user group will be synchronized from Azure. We must add the user groups that should be synchronized into this file/etc/xms/config/directory-sync/applications.yaml
From the Azure Portal, navigate to the user group you want synchronized and copy the "Object ID".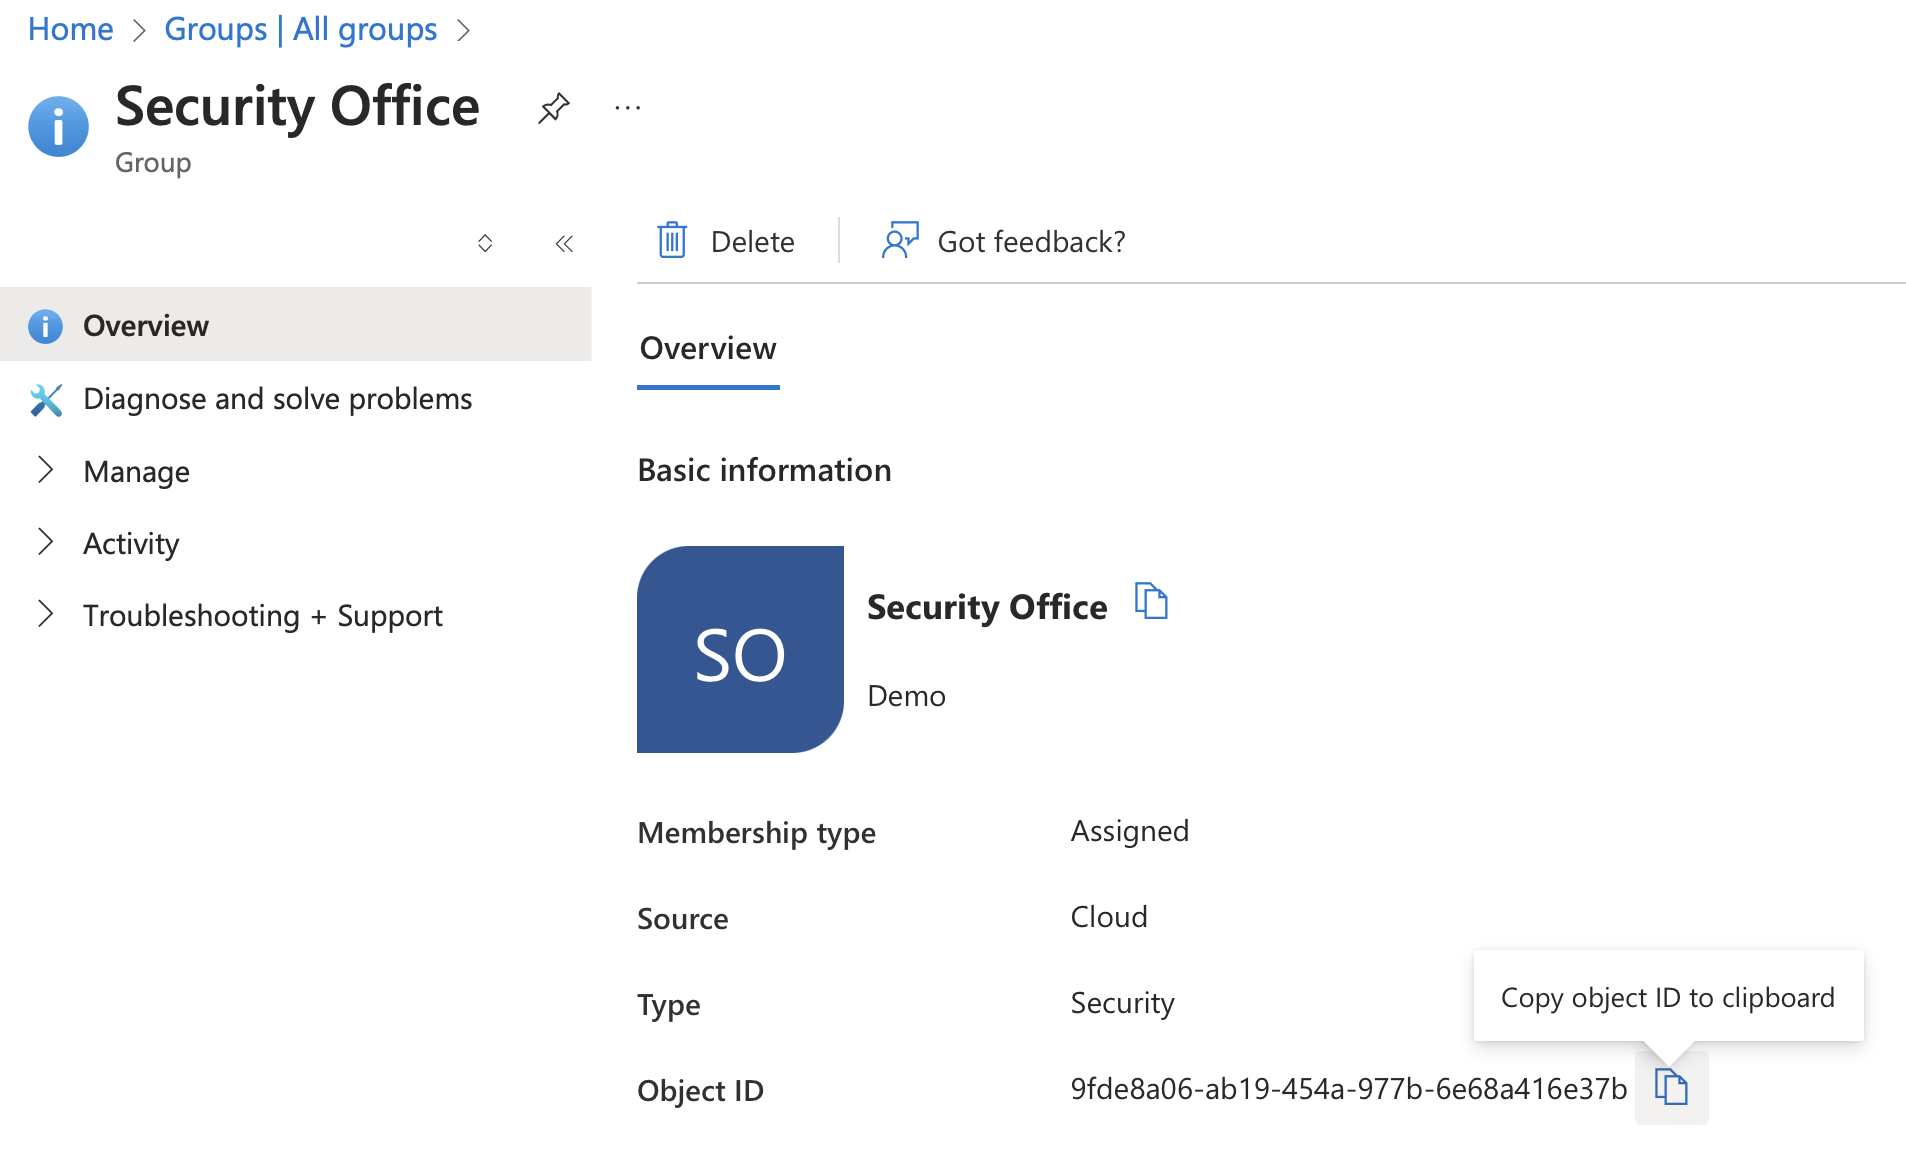
Now edit the applications.yaml
nano /etc/xms/config/directory-sync/applications.yaml
Add the Object ID for every group you want to synchronize according to the following example:
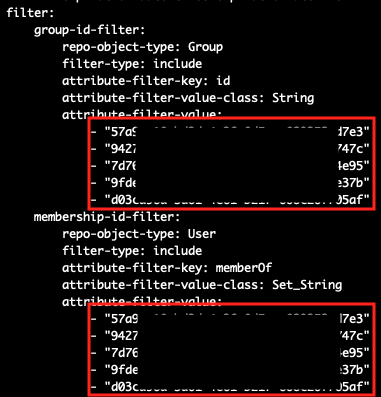
When this file is changed, you must restart the directory.sync container:
sudo docker restart xms-directory-sync-1
When logging into the XMS interface, you should now see users and groups.